Writing and Organizing Tests
What you'll learn
- How to organize your test and support files.
- What languages are supported in your test files.
- How Cypress handles unit tests vs integration tests.
- How to group your tests.
Best Practices
We recently gave a "Best Practices" conference talk at AssertJS (February 2018). This video demonstrates how to approach breaking down your application and organizing your tests.
https://www.youtube.com/watch?v=5XQOK0v_YREFolder structure
After adding a new project, Cypress will automatically scaffold out a suggested folder structure. By default it will create:
/cypress
  /fixtures
    - example.json

  /integration
    /examples
      /1-getting-started
        - todo.spec.js
      /2-advanced-examples
        - actions.spec.js
        - aliasing.spec.js
        - assertions.spec.js
        - connectors.spec.js
        - cookies.spec.js
        - cypress_api.spec.js
        - files.spec.js
        - local_storage.spec.js
        - location.spec.js
        - misc.spec.js
        - navigation.spec.js
        - network_requests.spec.js
        - querying.spec.js
        - spies_stubs_clocks.spec.js
        - traversal.spec.js
        - utilities.spec.js
        - viewport.spec.js
        - waiting.spec.js
        - window.spec.js

  /plugins
    - index.js

  /support
    - commands.js
    - index.js
Configuring Folder Structure
While Cypress allows you to configure where your tests, fixtures, and support files are located, if you're starting your first project, we recommend you use the above structure.
You can modify the folder configuration in your configuration file. See configuration for more detail.
What files should I add to my '.gitignore file' ?
Cypress will create a
screenshotsFolder and a
videosFolder to store the
screenshots and videos taken during the testing of your application. Many users
will opt to add these folders to their .gitignore file. Additionally, if you
are storing sensitive environment variables in your configuration file
(cypress.json by default) or
cypress.env.json,
these should also be ignored when you check into source control.
Test files
Test files are located in cypress/integration by default, but can be
configured to another
directory. Test files may be written as:
.js.jsx.coffee.cjsx
Cypress also supports ES2015 out of the box. You can use either
ES2015 modules or CommonJS modules. This means you can import or require
both npm packages and local relative modules.
Example Recipe
Check out our recipe using ES2015 and CommonJS modules.
To see an example of every command used in Cypress, open the
2-advanced-examples folder
within your cypress/integration folder.
To start writing tests for your app, create a new file like app_spec.js within
your cypress/integration folder. Refresh your tests list in the Cypress Test
Runner and your new file should have appeared in the list.
Fixture Files
Fixtures are used as external pieces of static data that can be used by your
tests. Fixture files are located in cypress/fixtures by default, but can be
configured to another
directory.
You would typically use them with the cy.fixture()
command and most often when you're stubbing
Network Requests.
Asset Files
There are some folders that may be generated after a test run, containing assets that were generated during the test run.
You may consider adding these folders to your .gitignore file to ignore
checking these files into source control.
Download Files
Any files downloaded while testing an application's file download feature will
be stored in the downloadsFolder
which is set to cypress/downloads by default.
/cypress
  /downloads
    - records.csv
Screenshot Files
If screenshots were taken via the cy.screenshot()
command or automatically when a test fails, the screenshots are stored in the
screenshotsFolder which is set
to cypress/screenshots by default.
/cypress
  /screenshots
    /app_spec.js
      - Navigates to main menu (failures).png
To learn more about screenshots and settings available, see Screenshots and Videos
Video Files
Any videos recorded of the run are stored in the
videosFolder which is set to
cypress/videos by default.
/cypress
  /videos
    - app_spec.js.mp4
To learn more about videos and settings available, see Screenshots and Videos
Plugins file
The plugins file is a special file that executes in Node before the project is loaded, before the browser launches, and during your test execution. While the Cypress tests execute in the browser, the plugins file runs in the background Node process, giving your tests the ability to access the file system and the rest of the operating system by calling the cy.task() command.
The plugins file is a good place to define how you want to bundle the spec files via the preprocessors, how to find and launch the browsers via the browser launch API, and other cool things. Read our plugins guide for more details and examples.
The initial imported plugins file can be configured to another file.
Support file
By default Cypress will automatically include the support file
cypress/support/index.js. This file runs before every single spec file. We
do this purely as a convenience mechanism so you don't have to import this file
in every single one of your spec files.
The initial imported support file can be configured to another file or turned off completely using the supportFile configuration.
The support file is a great place to put reusable behavior such as custom commands or global overrides that you want applied and available to all of your spec files.
From your support file you can import or require other files to keep things
organized.
We automatically seed an example support file, which has several commented out examples.
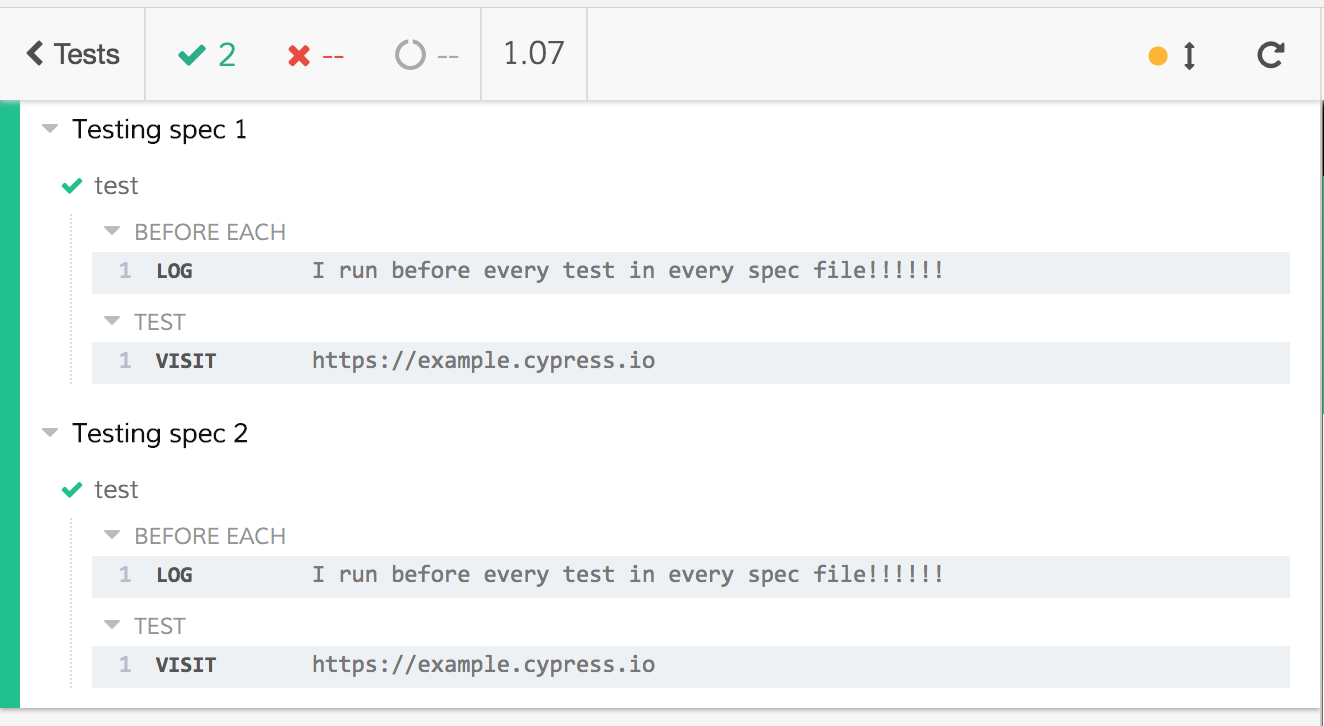
You can define behaviors in a before or beforeEach within any of the
cypress/support files:
beforeEach(() => {
  cy.log('I run before every test in every spec file!!!!!!')
})
Note: This example assumes you are already familiar with Mocha hooks.
Execution
Cypress executes the support file before the spec file. For example when you
click on a test file named spec-a.js via
cypress open, then the Test Runner
executes the files in the following order:
<!-- bundled support file -->
<script src="support/index.js"></script>
<!-- bundled spec file -->
<script src="integration/spec-a.js"></script>
The same happens when using the cypress run command: a new browser window is opened for each support and spec file pair.
But when you click on "Run all specs" button after cypress open, the Test Runner bundles and concatenates all specs together, in essence running scripts like shown below. This means the code in the support file is executed once before all spec files, instead of once before each spec file.
<!-- bundled support file -->
<script src="support/index.js"></script>
<!-- bundled first spec file, second spec file, etc -->
<script src="integration/spec-a.js"></script>
<script src="integration/spec-b.js"></script>
...
<script src="integration/spec-n.js"></script>
Having a single support file when running all specs together might execute
before and beforeEach hooks in ways you may not anticipate. Read
Be careful when running all specs together
for examples.
Troubleshooting
If Cypress does not find the spec files for some reason, you can troubleshoot its logic by opening or running Cypress with debug logs enabled:
DEBUG=cypress:server:specs npx cypress open
## or
DEBUG=cypress:server:specs npx cypress run
Writing tests
Cypress is built on top of Mocha and
Chai. We support both Chai's BDD and
TDD assertion styles. Tests you write in Cypress will mostly adhere to this
style.
If you're familiar with writing tests in JavaScript, then writing tests in Cypress will be a breeze.
Test Structure
The test interface, borrowed from
Mocha, provides describe(),
context(), it() and specify().
context() is identical to describe() and specify() is identical to it(),
so choose whatever terminology works best for you.
// -- Start: Our Application Code --
function add(a, b) {
  return a + b
}

function subtract(a, b) {
  return a - b
}

function divide(a, b) {
  return a / b
}

function multiply(a, b) {
  return a * b
}
// -- End: Our Application Code --

// -- Start: Our Cypress Tests --
describe('Unit test our math functions', () => {
  context('math', () => {
    it('can add numbers', () => {
      expect(add(1, 2)).to.eq(3)
    })

    it('can subtract numbers', () => {
      expect(subtract(5, 12)).to.eq(-7)
    })

    specify('can divide numbers', () => {
      expect(divide(27, 9)).to.eq(3)
    })

    specify('can multiply numbers', () => {
      expect(multiply(5, 4)).to.eq(20)
    })
  })
})
// -- End: Our Cypress Tests --
Hooks
Cypress also provides hooks (borrowed from Mocha).
These are helpful to set conditions that you want to run before a set of tests or before each test. They're also helpful to clean up conditions after a set of tests or after each test.
before(() => {
  // root-level hook
  // runs once before all tests
})

beforeEach(() => {
  // root-level hook
  // runs before every test block
})

afterEach(() => {
  // runs after each test block
})

after(() => {
  // runs once all tests are done
})

describe('Hooks', () => {
  before(() => {
    // runs once before all tests in the block
  })

  beforeEach(() => {
    // runs before each test in the block
  })

  afterEach(() => {
    // runs after each test in the block
  })

  after(() => {
    // runs once after all tests in the block
  })
})
The order of hook and test execution is as follows:
- All
before()hooks run (once) - Any
beforeEach()hooks run - Tests run
- Any
afterEach()hooks run - All
after()hooks run (once)
after()
or
afterEach()
hooks, please see our
thoughts on the anti-pattern of cleaning up state with after() or afterEach()
.
describe
or
context
suites for isolation. Read
Be careful when running all specs together
.
Excluding and Including Tests
To run a specified suite or test, append .only to the function. All nested
suites will also be executed. This gives us the ability to run one test at a
time and is the recommended way to write a test suite.
// -- Start: Our Application Code --
function fizzbuzz(num) {
  if (num % 3 === 0 && num % 5 === 0) {
    return 'fizzbuzz'
  }

  if (num % 3 === 0) {
    return 'fizz'
  }

  if (num % 5 === 0) {
    return 'buzz'
  }
}
// -- End: Our Application Code --

// -- Start: Our Cypress Tests --
describe('Unit Test FizzBuzz', () => {
  function numsExpectedToEq(arr, expected) {
    // loop through the array of nums and make
    // sure they equal what is expected
    arr.forEach((num) => {
      expect(fizzbuzz(num)).to.eq(expected)
    })
  }

  it.only('returns "fizz" when number is multiple of 3', () => {
    numsExpectedToEq([9, 12, 18], 'fizz')
  })

  it('returns "buzz" when number is multiple of 5', () => {
    numsExpectedToEq([10, 20, 25], 'buzz')
  })

  it('returns "fizzbuzz" when number is multiple of both 3 and 5', () => {
    numsExpectedToEq([15, 30, 60], 'fizzbuzz')
  })
})
To skip a specified suite or test, append .skip() to the function. All nested
suites will also be skipped.
it.skip('returns "fizz" when number is multiple of 3', () => {
  numsExpectedToEq([9, 12, 18], 'fizz')
})
Test Configuration
It is possible to apply test configuration values to a suite or test. Pass a configuration object to the test or suite function as the second argument.
This configuration will take effect during the suite or tests where they are set then return to their previous default values after the suite or tests are complete.
Syntax
describe(name, config, fn)
context(name, config, fn)
it(name, config, fn)
specify(name, config, fn)
Allowed config values
Note: Some configuration values are readonly and cannot be changed via test configuration. Be sure to review the list of test configuration options .Suite configuration
If you want to target a suite of tests to run or be excluded when run in a
specific browser, you can override the browser configuration within the suite
configuration. The browser option accepts the same arguments as
Cypress.isBrowser().
The following suite of tests will be skipped if running tests in Chrome browsers.
describe('When NOT in Chrome', { browser: '!chrome' }, () => {
  it('Shows warning', () => {
    cy.get('.browser-warning').should(
      'contain',
      'For optimal viewing, use Chrome browser'
    )
  })

  it('Links to browser compatibility doc', () => {
    cy.get('a.browser-compat')
      .should('have.attr', 'href')
      .and('include', 'browser-compatibility')
  })
})
The following suite of tests will only execute when running in the Firefox browser. It will overwrite the viewport resolution in one of the tests, and will merge any current environment variables with the provided ones.
describe(
  'When in Firefox',
  {
    browser: 'firefox',
    viewportWidth: 1024,
    viewportHeight: 700,
    env: {
      DEMO: true,
      API: 'http://localhost:9000',
    },
  },
  () => {
    it('Sets the expected viewport and API URL', () => {
      expect(cy.config('viewportWidth')).to.equal(1024)
      expect(cy.config('viewportHeight')).to.equal(700)
      expect(cy.env('API')).to.equal('http://localhost:9000')
    })

    it(
      'Uses the closest API environment variable',
      {
        env: {
          API: 'http://localhost:3003',
        },
      },
      () => {
        expect(cy.env('API')).to.equal('http://localhost:3003')
        // other environment variables remain unchanged
        expect(cy.env('DEMO')).to.be.true
      }
    )
  }
)
Single test configuration
You can configure the number of retry attempts during cypress run or
cypress open. See Test Retries for more
information.
it('should redirect unauthenticated user to sign-in page', {
    retries: {
      runMode: 3,
      openMode: 2
    }
  } () => {
    cy.visit('/')
    // ...
  })
})
Dynamically Generate Tests
You can dynamically generate tests using JavaScript.
describe('if your app uses jQuery', () => {
  ;['mouseover', 'mouseout', 'mouseenter', 'mouseleave'].forEach((event) => {
    it('triggers event: ' + event, () => {
      // if your app uses jQuery, then we can trigger a jQuery
      // event that causes the event callback to fire
      cy.get('#with-jquery')
        .invoke('trigger', event)
        .get('#messages')
        .should('contain', 'the event ' + event + 'was fired')
    })
  })
})
The code above will produce a suite with 4 tests:
> if your app uses jQuery
  > triggers event: 'mouseover'
  > triggers event: 'mouseout'
  > triggers event: 'mouseenter'
  > triggers event: 'mouseleave'
Assertion Styles
Cypress supports both BDD (expect/should) and TDD (assert) style plain
assertions. Read more about plain assertions.
it('can add numbers', () => {
  expect(add(1, 2)).to.eq(3)
})

it('can subtract numbers', () => {
  assert.equal(subtract(5, 12), -7, 'these numbers are equal')
})
The .should() command and its alias .and() can also be used to more easily chain assertions off of Cypress commands. Read more about assertions.
cy.wrap(add(1, 2)).should('equal', 3)
Running tests
Run a single spec file
We suggest running test files individually by clicking on the spec filename to ensure the best performance. For example the Cypress RealWorld App has multiple test files, but below we run a single "new-transaction.spec.ts" test file.
Run all specs
You can run all spec files together by clicking the "Run all specs" button. This mode is equivalent to concatenating all spec files together into a single piece of test code.
describe
or
context
suites for isolation. Read
Be careful when running all specs together
.
Run filtered specs
You can also run a subset of all specs by entering a text search filter. Only the specs with relative file paths containing the search filter will remain and be run as if concatenating all spec files together when clicking the "Run N specs" button.
- The search filter is case-insensitive; the filter "ui" will match both "UI-spec.js" and "admin-ui-spec.js" files.
- The search filter is applied to the entire relative spec file path, thus you can use folder names to limit the specs; the filter "ui" will match both "admin-ui.spec.js" and "ui/admin.spec.js" files.
Test statuses
After the Cypress spec completes every test has one of 4 statuses: passed, failed, pending, or skipped.
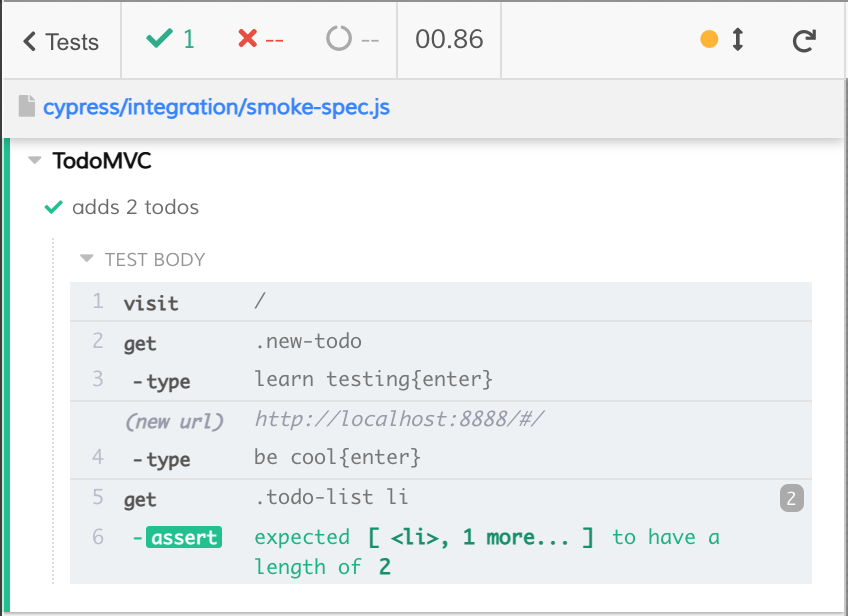
Passed
Passed tests have successfully completed all their commands without failing any assertions. The test screenshot below shows a passed test:
Note that a test can pass after several test retries. In that case the Command Log shows some failed attempts, but ultimately the entire test finishes successfully.
Failed
Good news - the failed test has found a problem. Could be much worse - it could be a user hitting this bug!
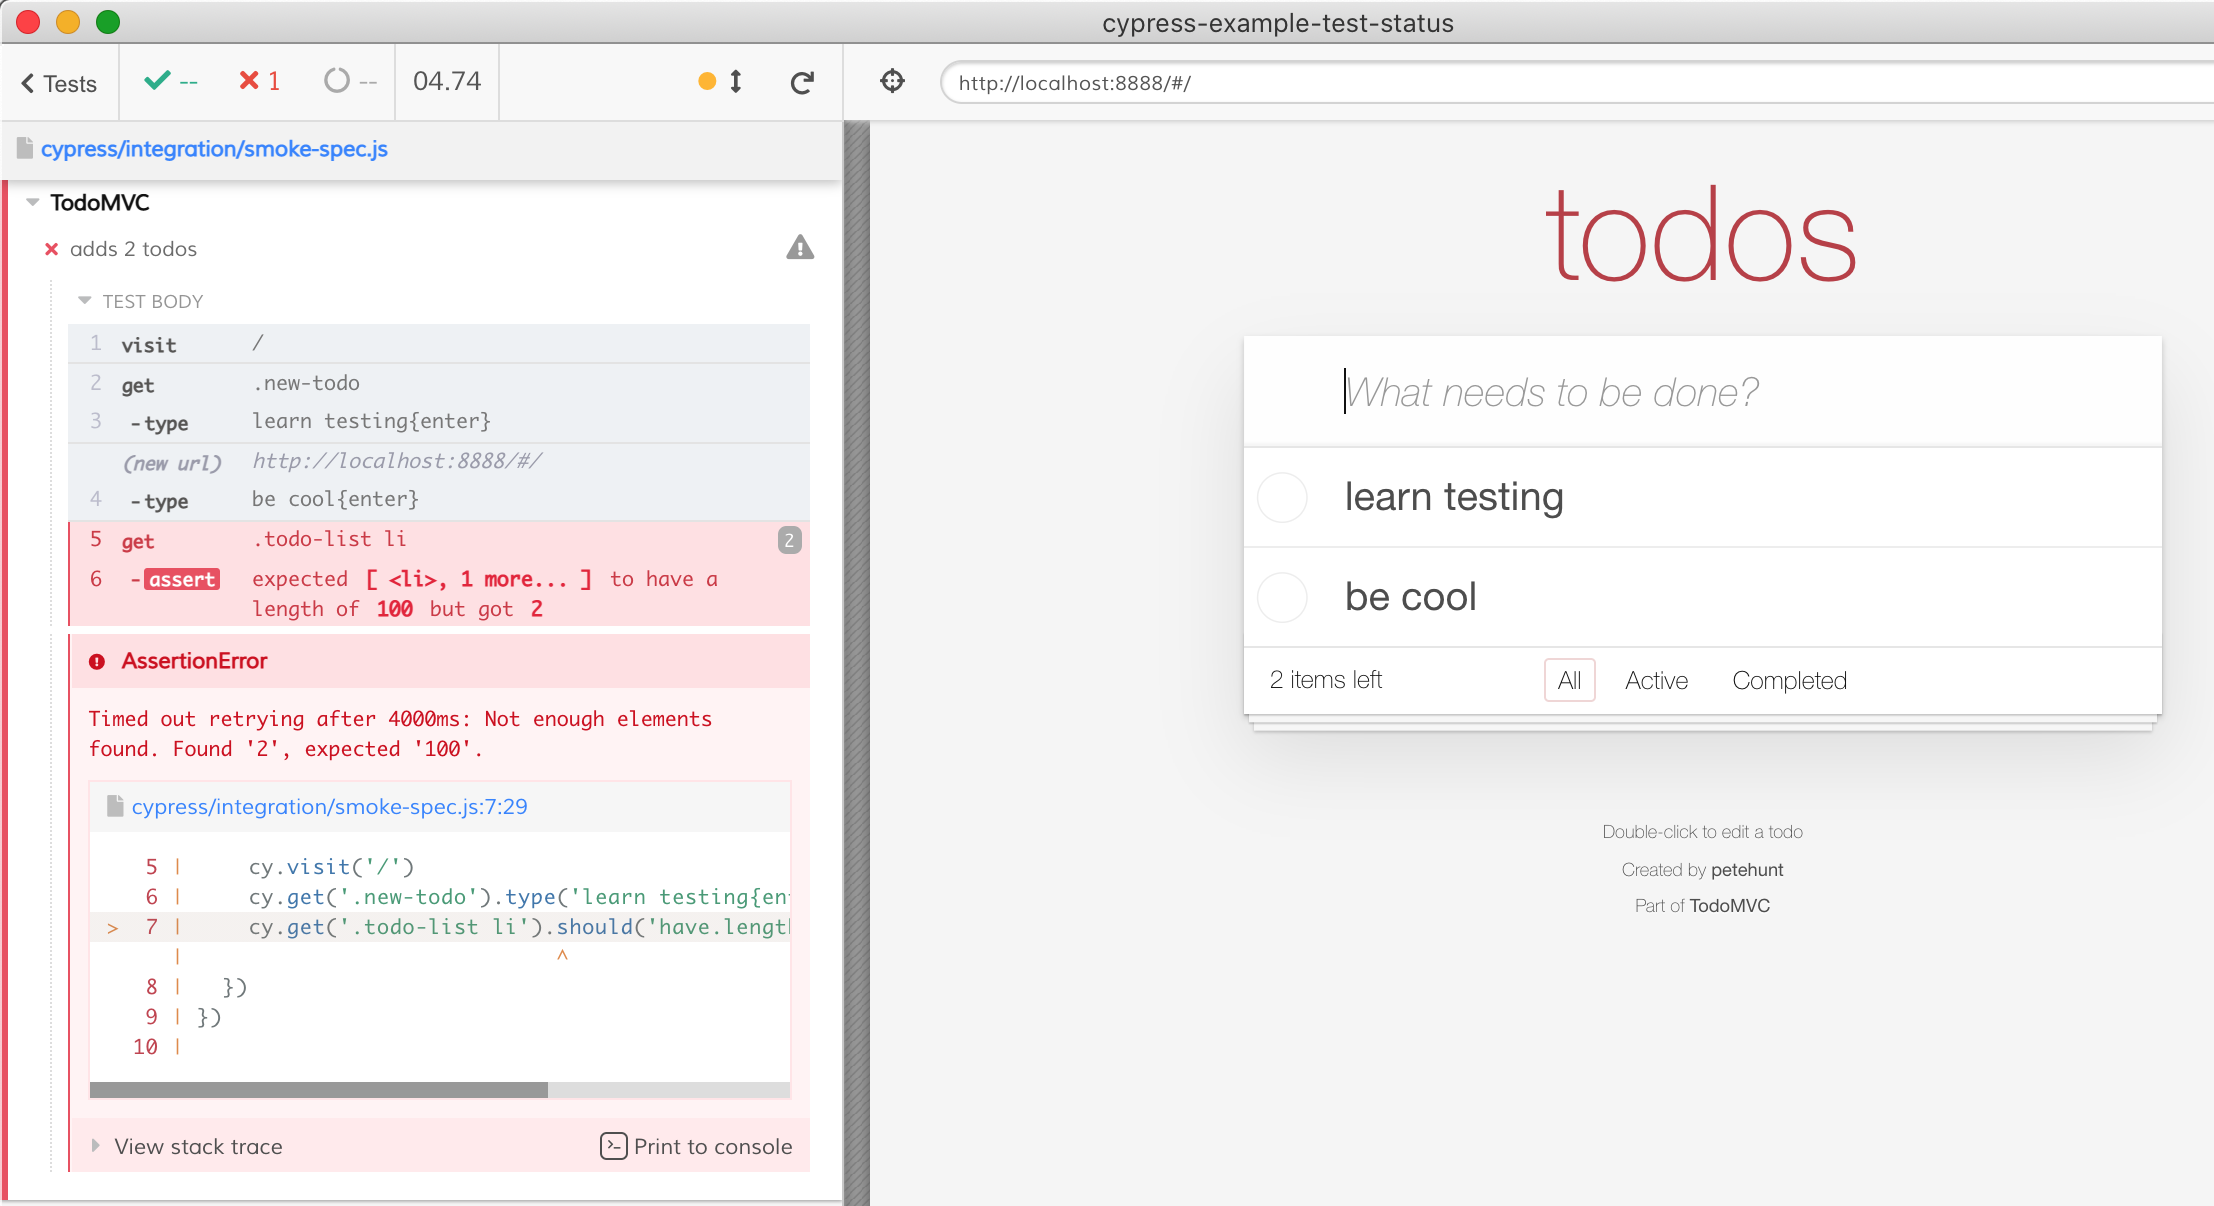
After a test fails, the screenshots and videos can help find the problem so it can be fixed.
Pending
You can write placeholder tests in several ways as shown below, and Cypress knows NOT to run them. Cypress marks all the tests below as pending.
describe('TodoMVC', () => {
  it('is not written yet')

  it.skip('adds 2 todos', function () {
    cy.visit('/')
    cy.get('.new-todo').type('learn testing{enter}').type('be cool{enter}')
    cy.get('.todo-list li').should('have.length', 100)
  })

  xit('another test', () => {
    expect(false).to.true
  })
})
All 3 tests above are marked pending when Cypress finishes running the spec file.
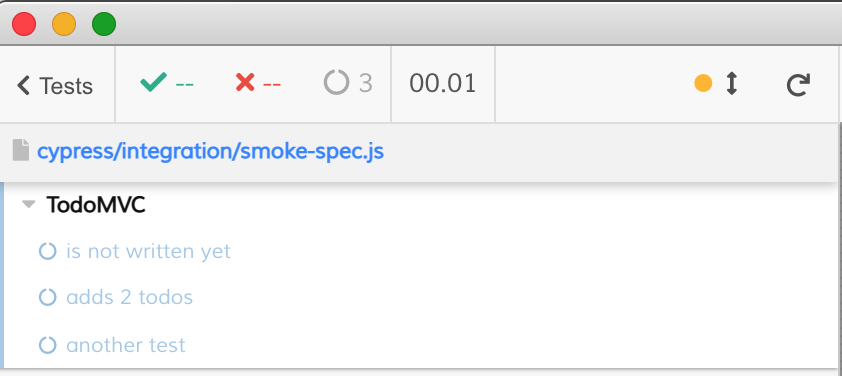
So remember - if you (the test writer) knowingly skip a test using one of the above three ways, Cypress counts it as a pending test.
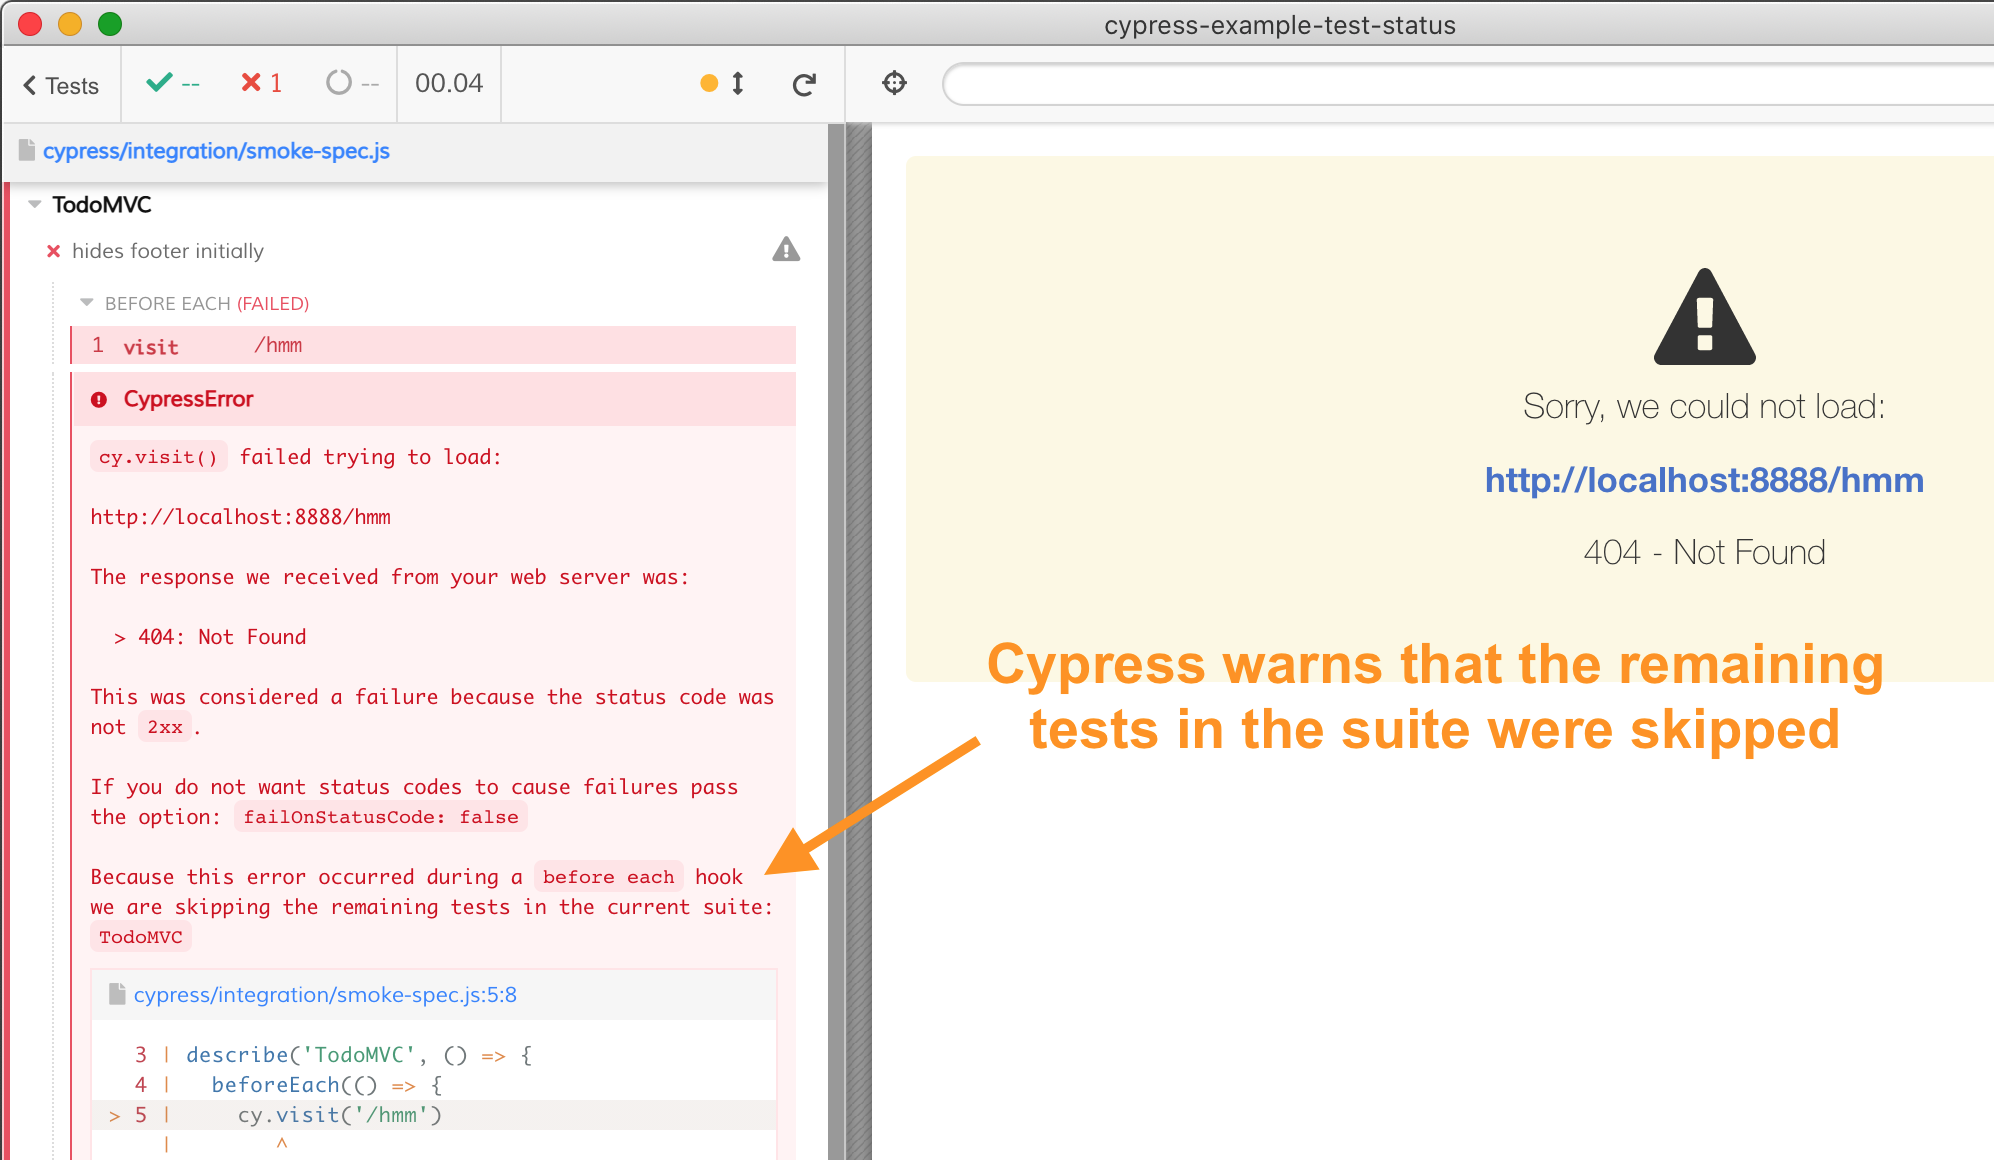
Skipped
The last test status is for tests that you meant to run, but these tests were
skipped due to some run-time error. For example, imagine a group of tests
sharing the same beforeEach hook - where you visit the page in the
beforeEach hook.
/// <reference types="cypress" />

describe('TodoMVC', () => {
  beforeEach(() => {
    cy.visit('/')
  })

  it('hides footer initially', () => {
    cy.get('.filters').should('not.exist')
  })

  it('adds 2 todos', () => {
    cy.get('.new-todo').type('learn testing{enter}').type('be cool{enter}')
    cy.get('.todo-list li').should('have.length', 2)
  })
})
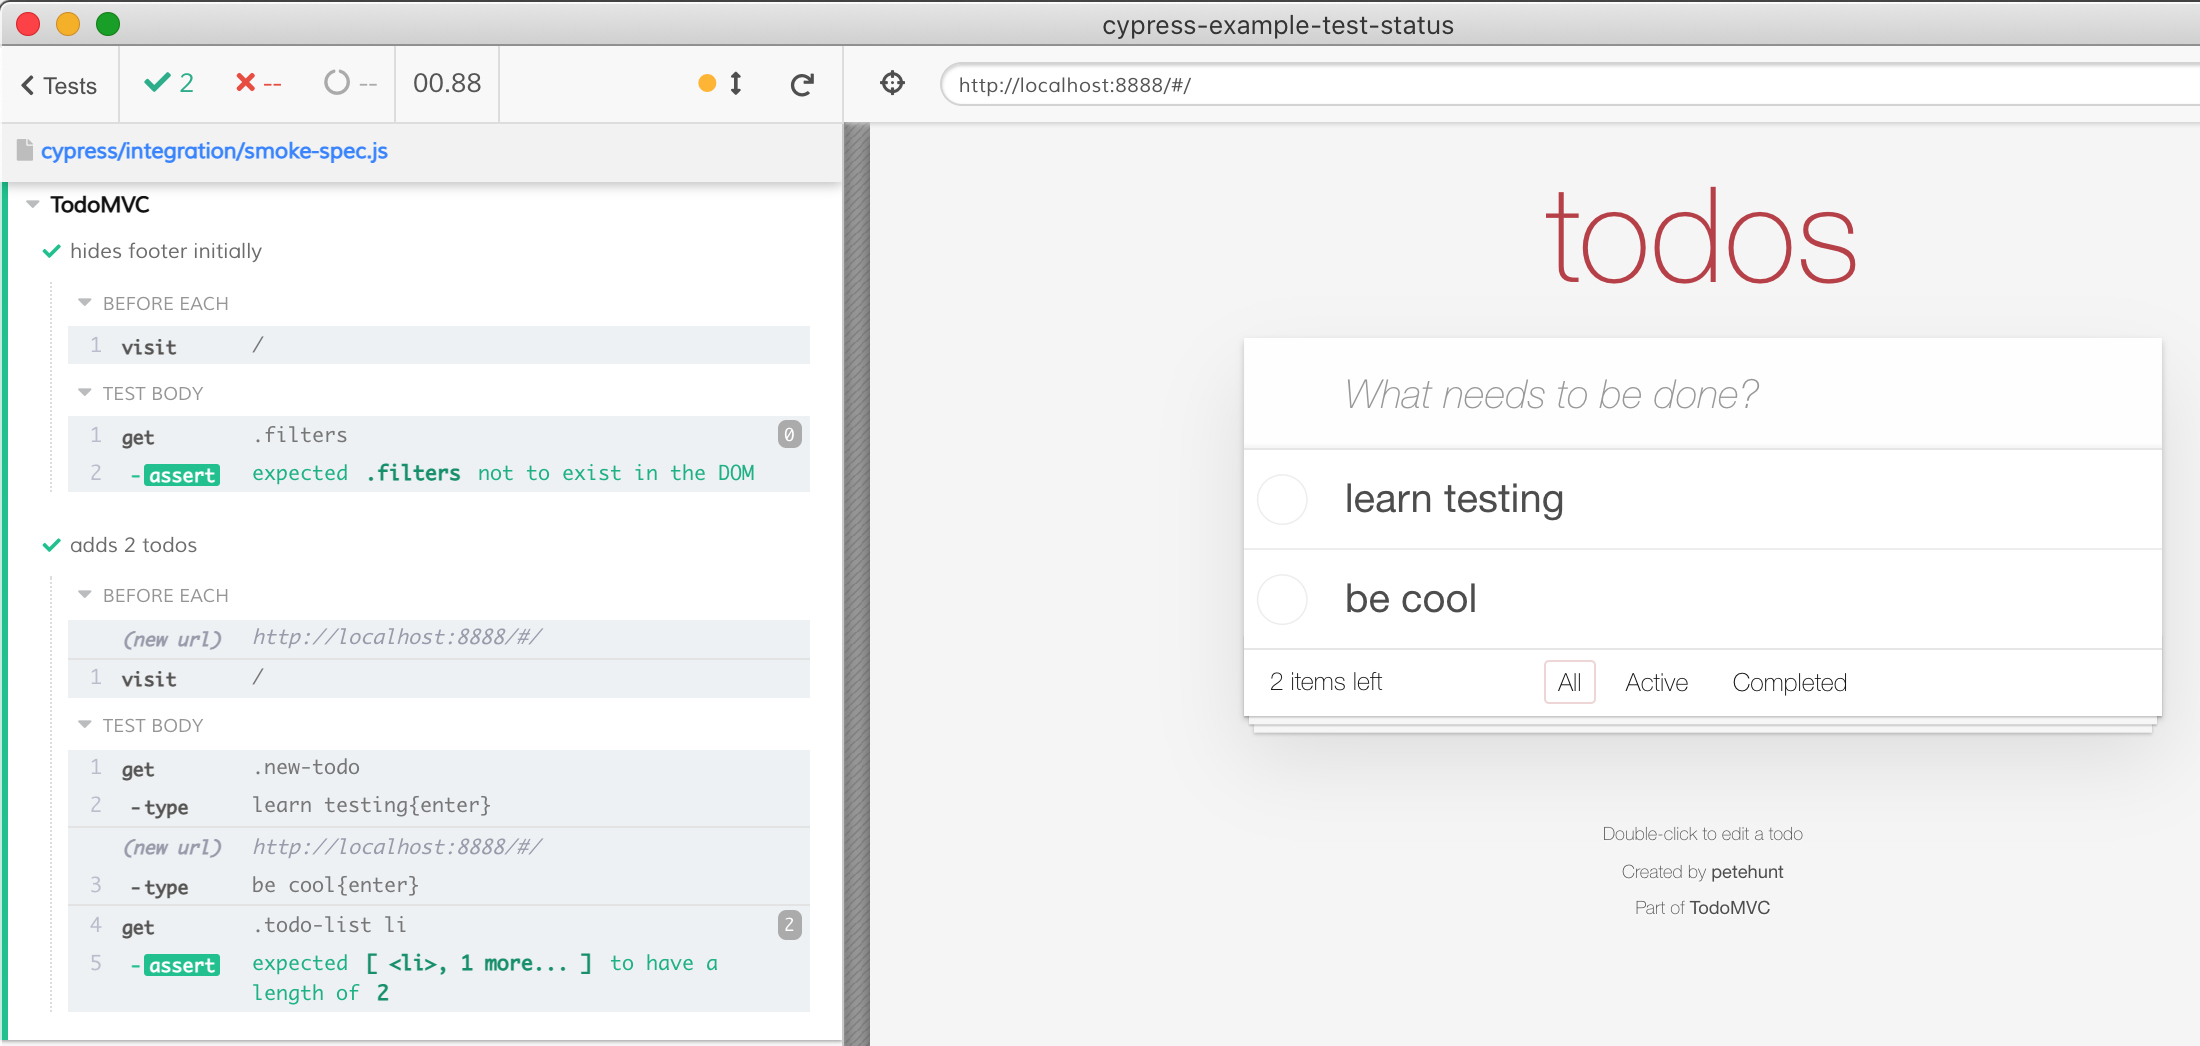
If the beforeEach hook completes and both tests finish, two tests are passing.
But what happens if a command inside the beforeEach hook fails? For example,
let's pretend we want to visit a non-existent page /does-not-exist instead of
the /. If we change our beforeEach to fail:
beforeEach(() => {
  cy.visit('/does-not-exist')
})
When Cypress starts executing the first test, the beforeEach hook fails. Now
the first test is marked as failed. BUT if the beforeEach hook failed
once, why would we execute it again before the second test? It would just fail
the same way! So Cypress skips the remaining tests in that block, because they
would also fail due to the beforeEach hook failure.
If we collapse the test commands, we can see the empty box marking the skipped test "adds 2 todos".
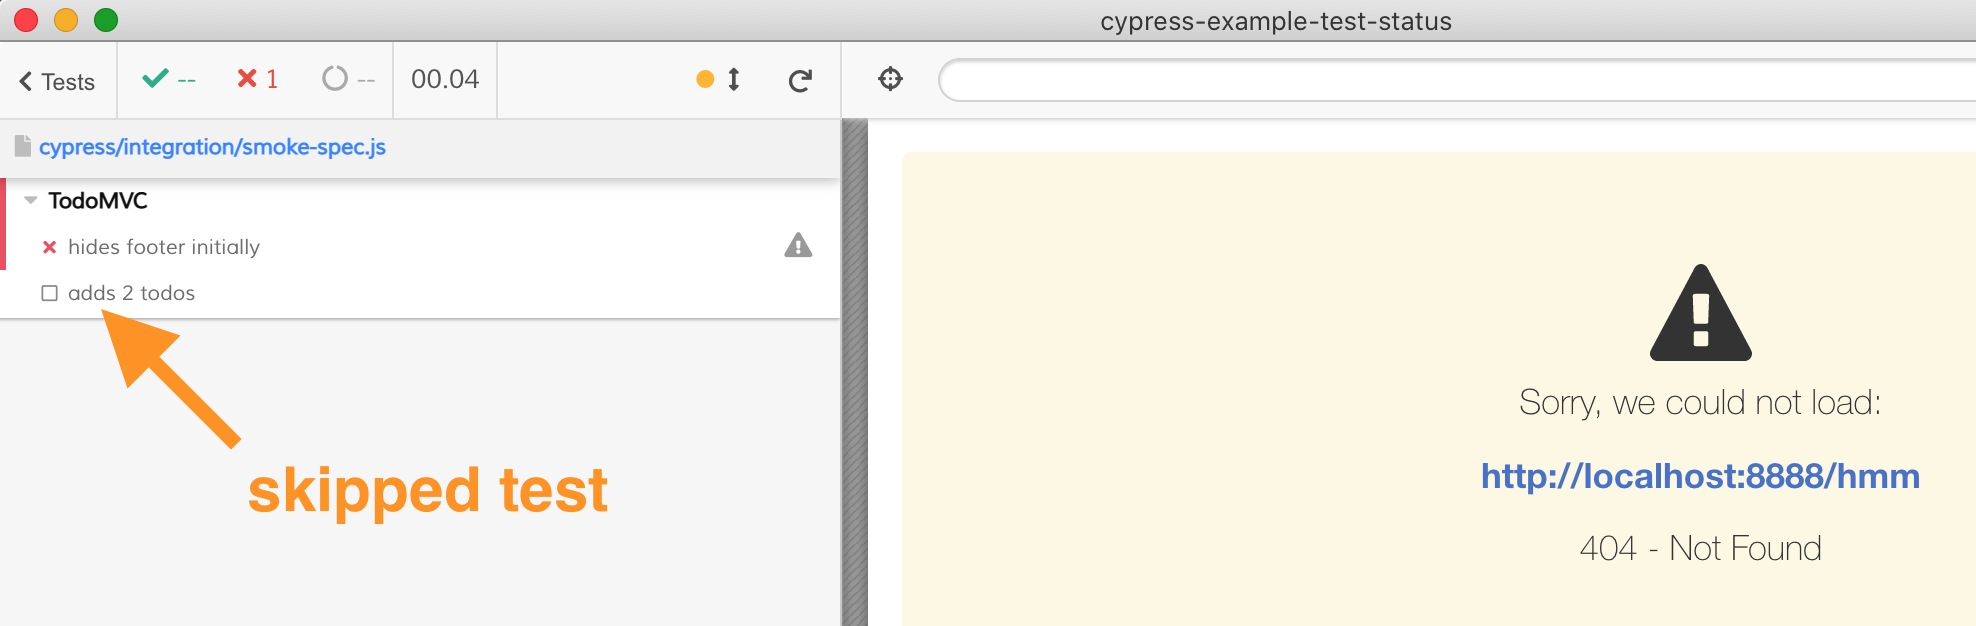
The tests that were meant to be executed but were skipped due to some run-time problem are marked "skipped" by Cypress.
Tip: read the blog post Cypress Test Statuses for more examples explaining the reasoning behind these test statuses. Read the blog post Writing Test Progress to learn how to use the pending tests to tracking the test strategy implementation.
Watching tests
When running in using cypress open, Cypress watches the filesystem for changes to your spec files. Soon after adding or updating a test Cypress will reload it and run all of the tests in that spec file.
This makes for a productive development experience because you can add and edit tests as you're implementing a feature and the Cypress user interface will always reflect the results of your latest edits.
Remember to use
.only
to limit which tests are run: this can be especially useful when you've got a
lot of tests in a single spec file that you're constantly editing; consider also
splitting your tests into smaller files each dealing with logically related
behavior.
What is watched?
Files
Folders
- Integration directory (
cypress/integration/by default) - Support directory (
cypress/support/by default) - Plugins directory (
cypress/plugins/by default)
The folder, the files within the folder, and all child folders and their files (recursively) are watched.
Those folder paths refer to the default folder paths. If you've configured Cypress to use different folder paths then the folders specific to your configuration will be watched.
What isn't watched?
Everything else; this includes, but isn't limited to, the following:
- Your application code
node_modulescypress/fixtures/
If you're developing using a modern JS-based web application stack then you've likely got support for some form of hot module replacement which is responsible for watching your application code—HTML, CSS, JS, etc.—and transparently reloading your application in response to changes.
Configuration
Set the watchForFileChanges
configuration property to false to disable file watching.
Nothing is watched during cypress run.
The watchForFileChanges property is only in effect when running Cypress using
cypress open.
The component responsible for the file-watching behavior in Cypress is the
webpack-preprocessor.
This is the default file-watcher packaged with Cypress.
If you need further control of the file-watching behavior you can configure this preprocessor explicitly: it exposes options that allow you to configure behavior such as what is watched and the delay before emitting an "update" event after a change.
Cypress also ships other file-watching preprocessors; you'll have to configure these explicitly if you want to use them.