Projects
With Cypress, you have the ability to record your project's tests.
You typically want to record when running tests in Continuous Integration, but you can also record your tests when running locally.
Setup
To set up your project to record, you must use the Test Runner.
Set up a project to record
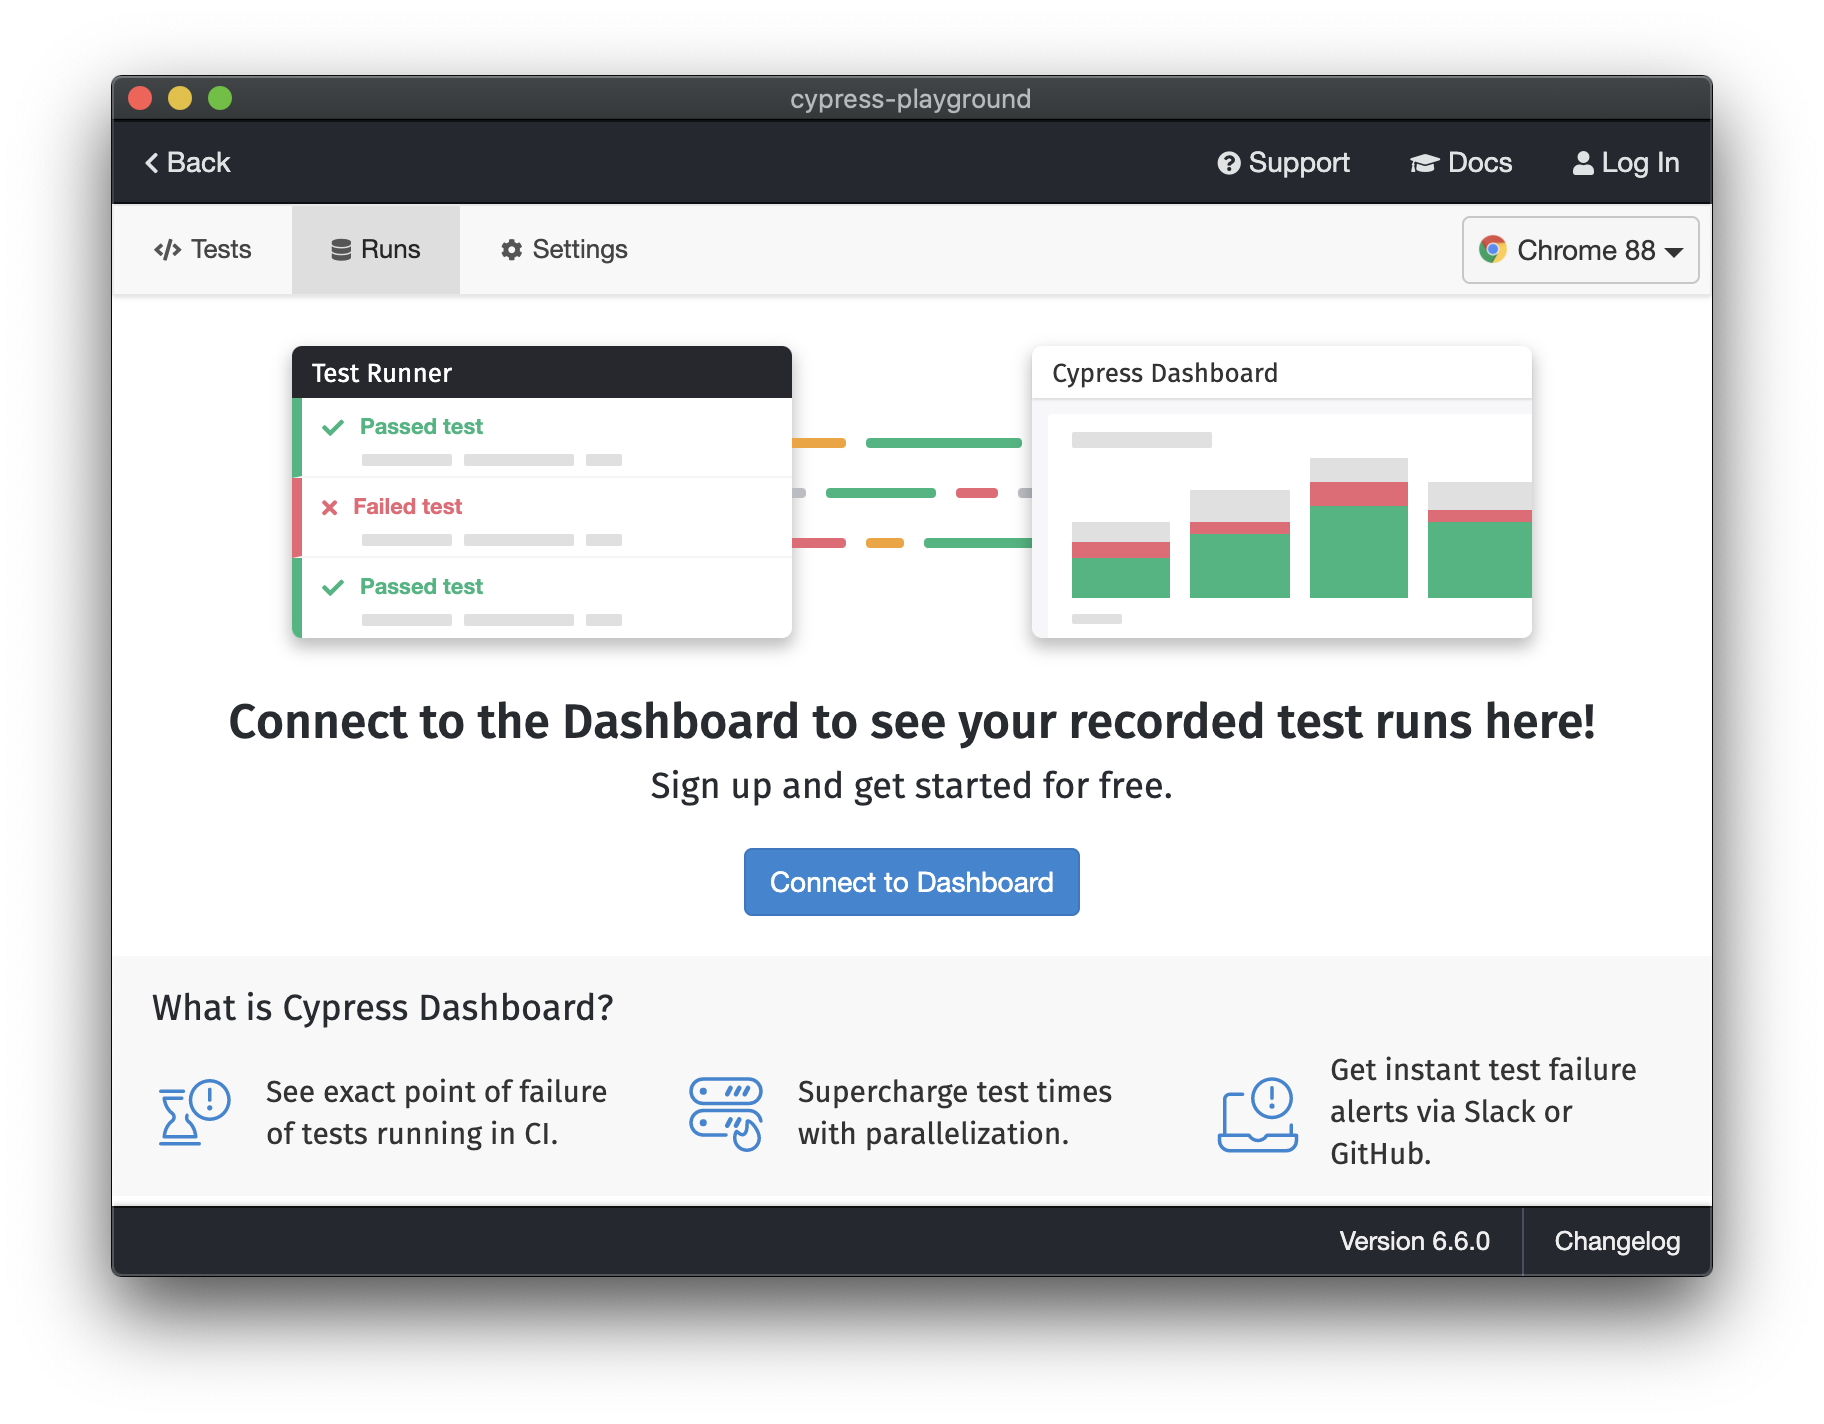
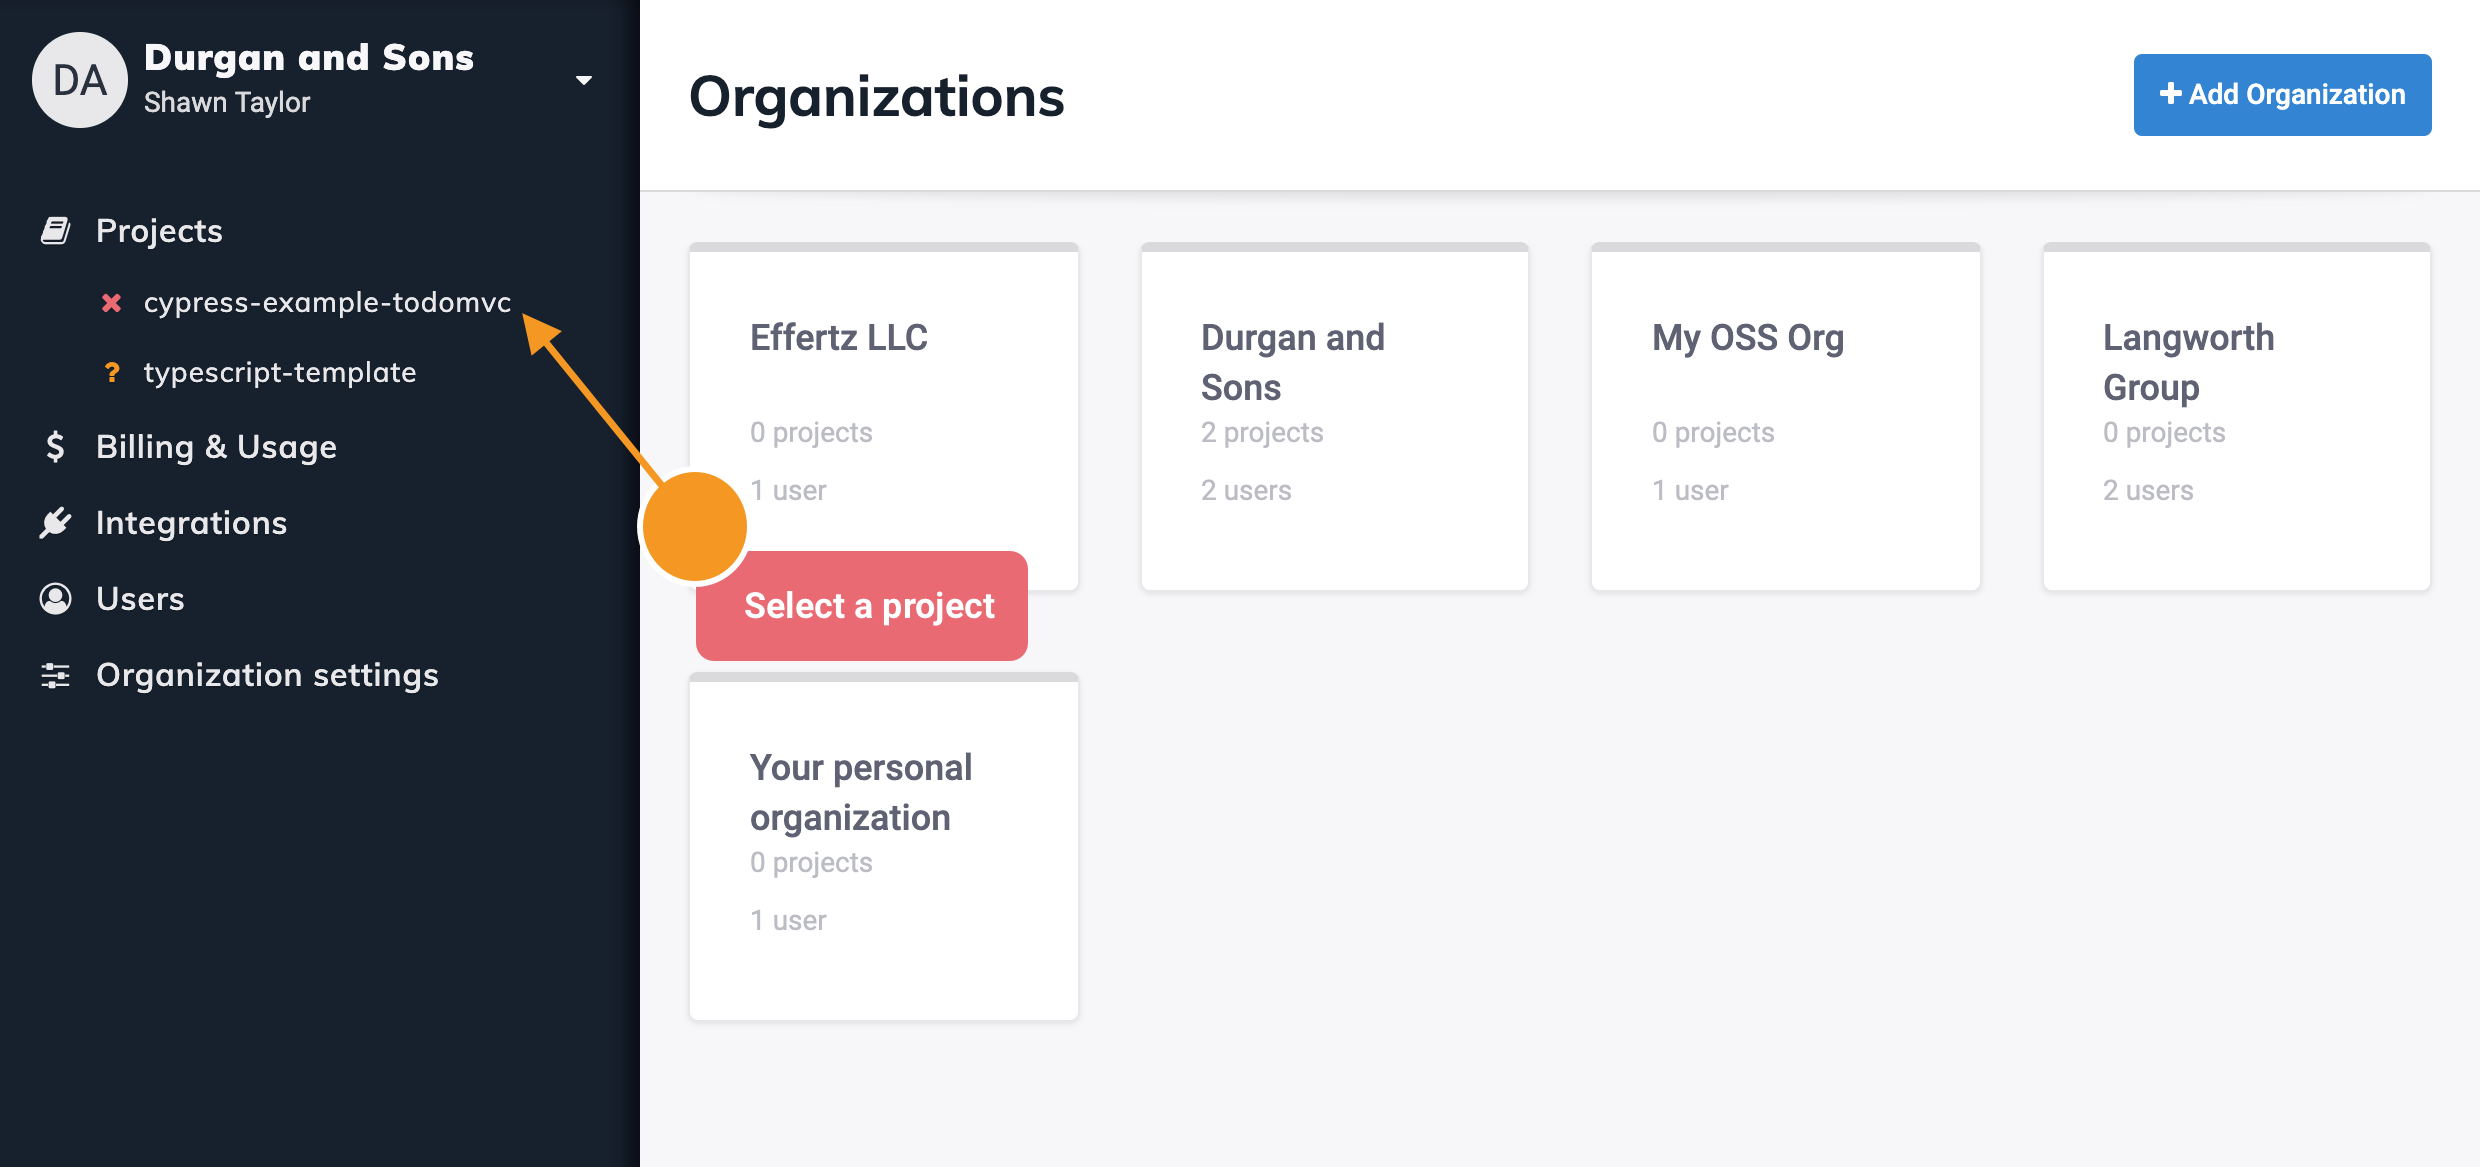
- Click on the Runs tab of your project within the Test Runner.
- Click Connect to Dashboard.
- You will need to log in to record your tests, so you'll be prompted to log in
to the Cypress Dashboard here if you haven't already done so.
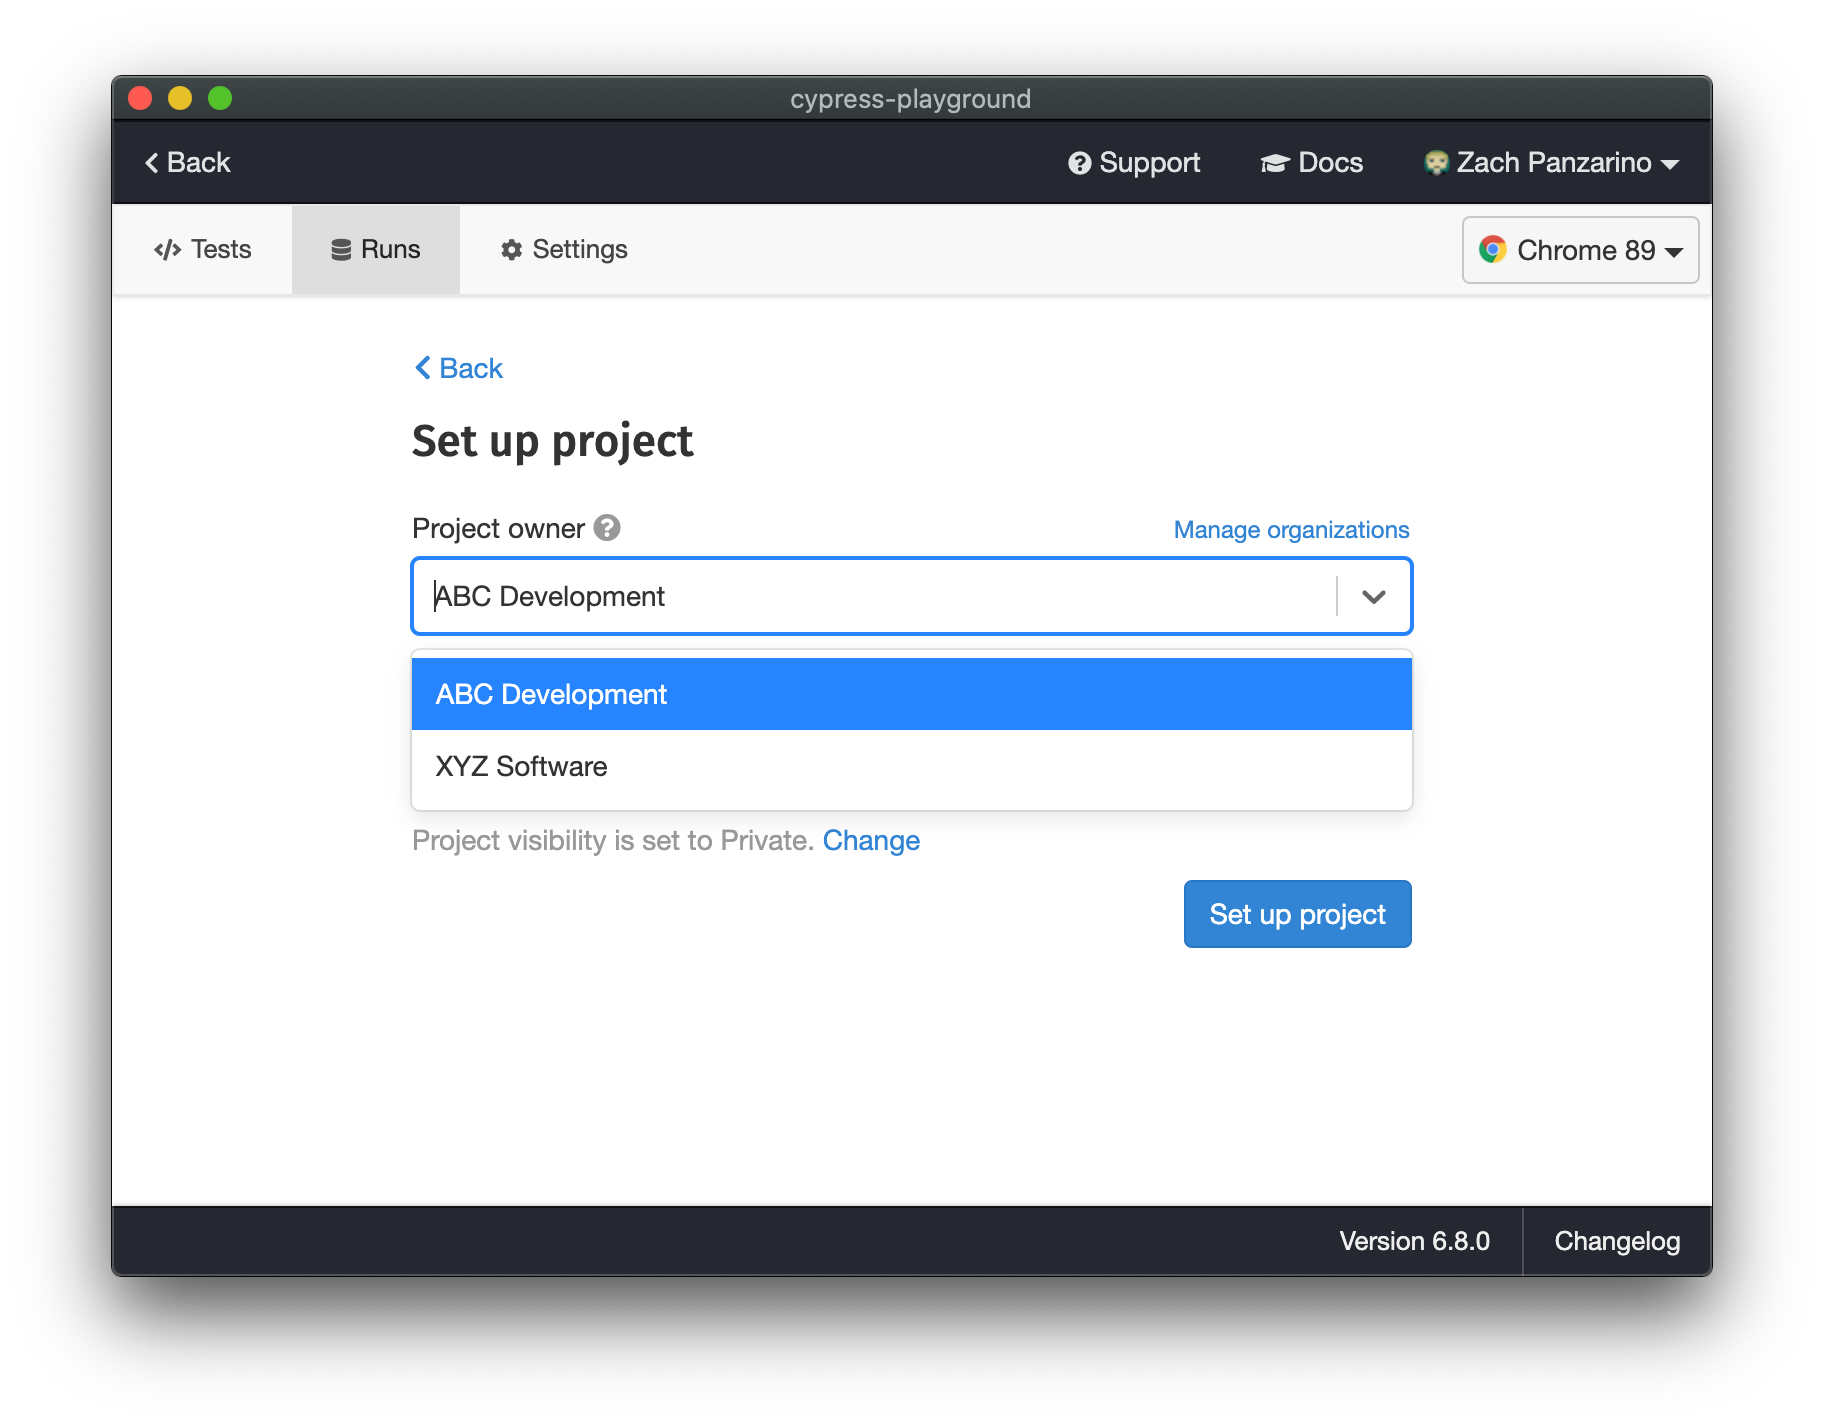
- Choose who owns the project. You can personally own it or select an
organization you're a member of. If you don't have any organizations, click
Create organization. Organizations work just like they do in GitHub and
enable you to separate your personal and work projects.
Read more about organizations.
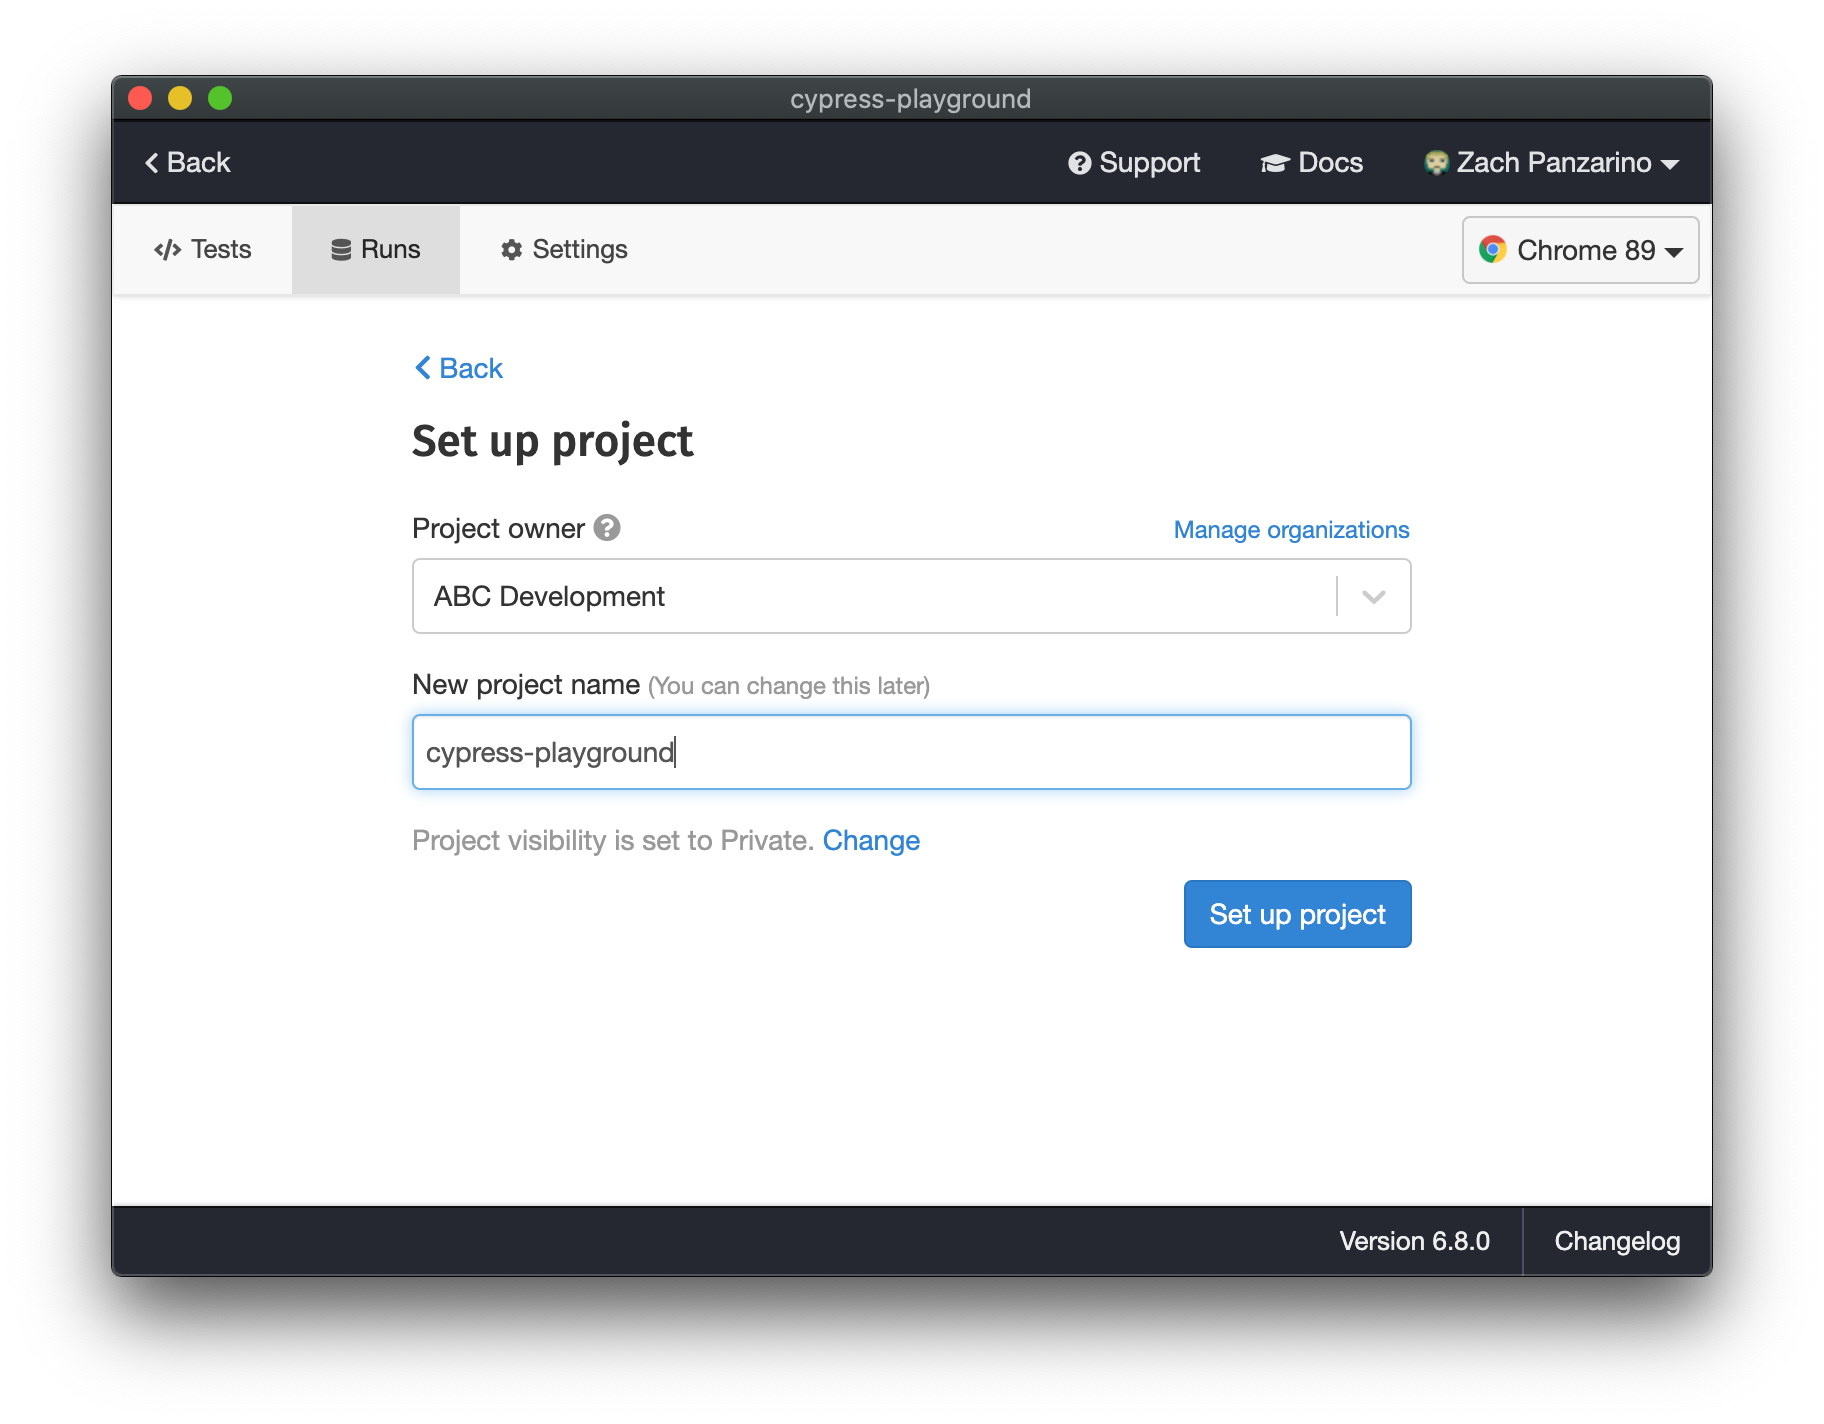
- If you don't have any existing projects, you'll have the opportunity to create a new one here. If you have existing projects and want to create a new one, you can click "Create a new project" to make a new one.
- Fill in the name of your project (this is only for display purposes and can be changed later).
- Choose whether this project is Public or Private.
- A public project can have its recordings and runs seen by anyone. Typically these are open source projects.
- A private project restricts its access to only users you invite.
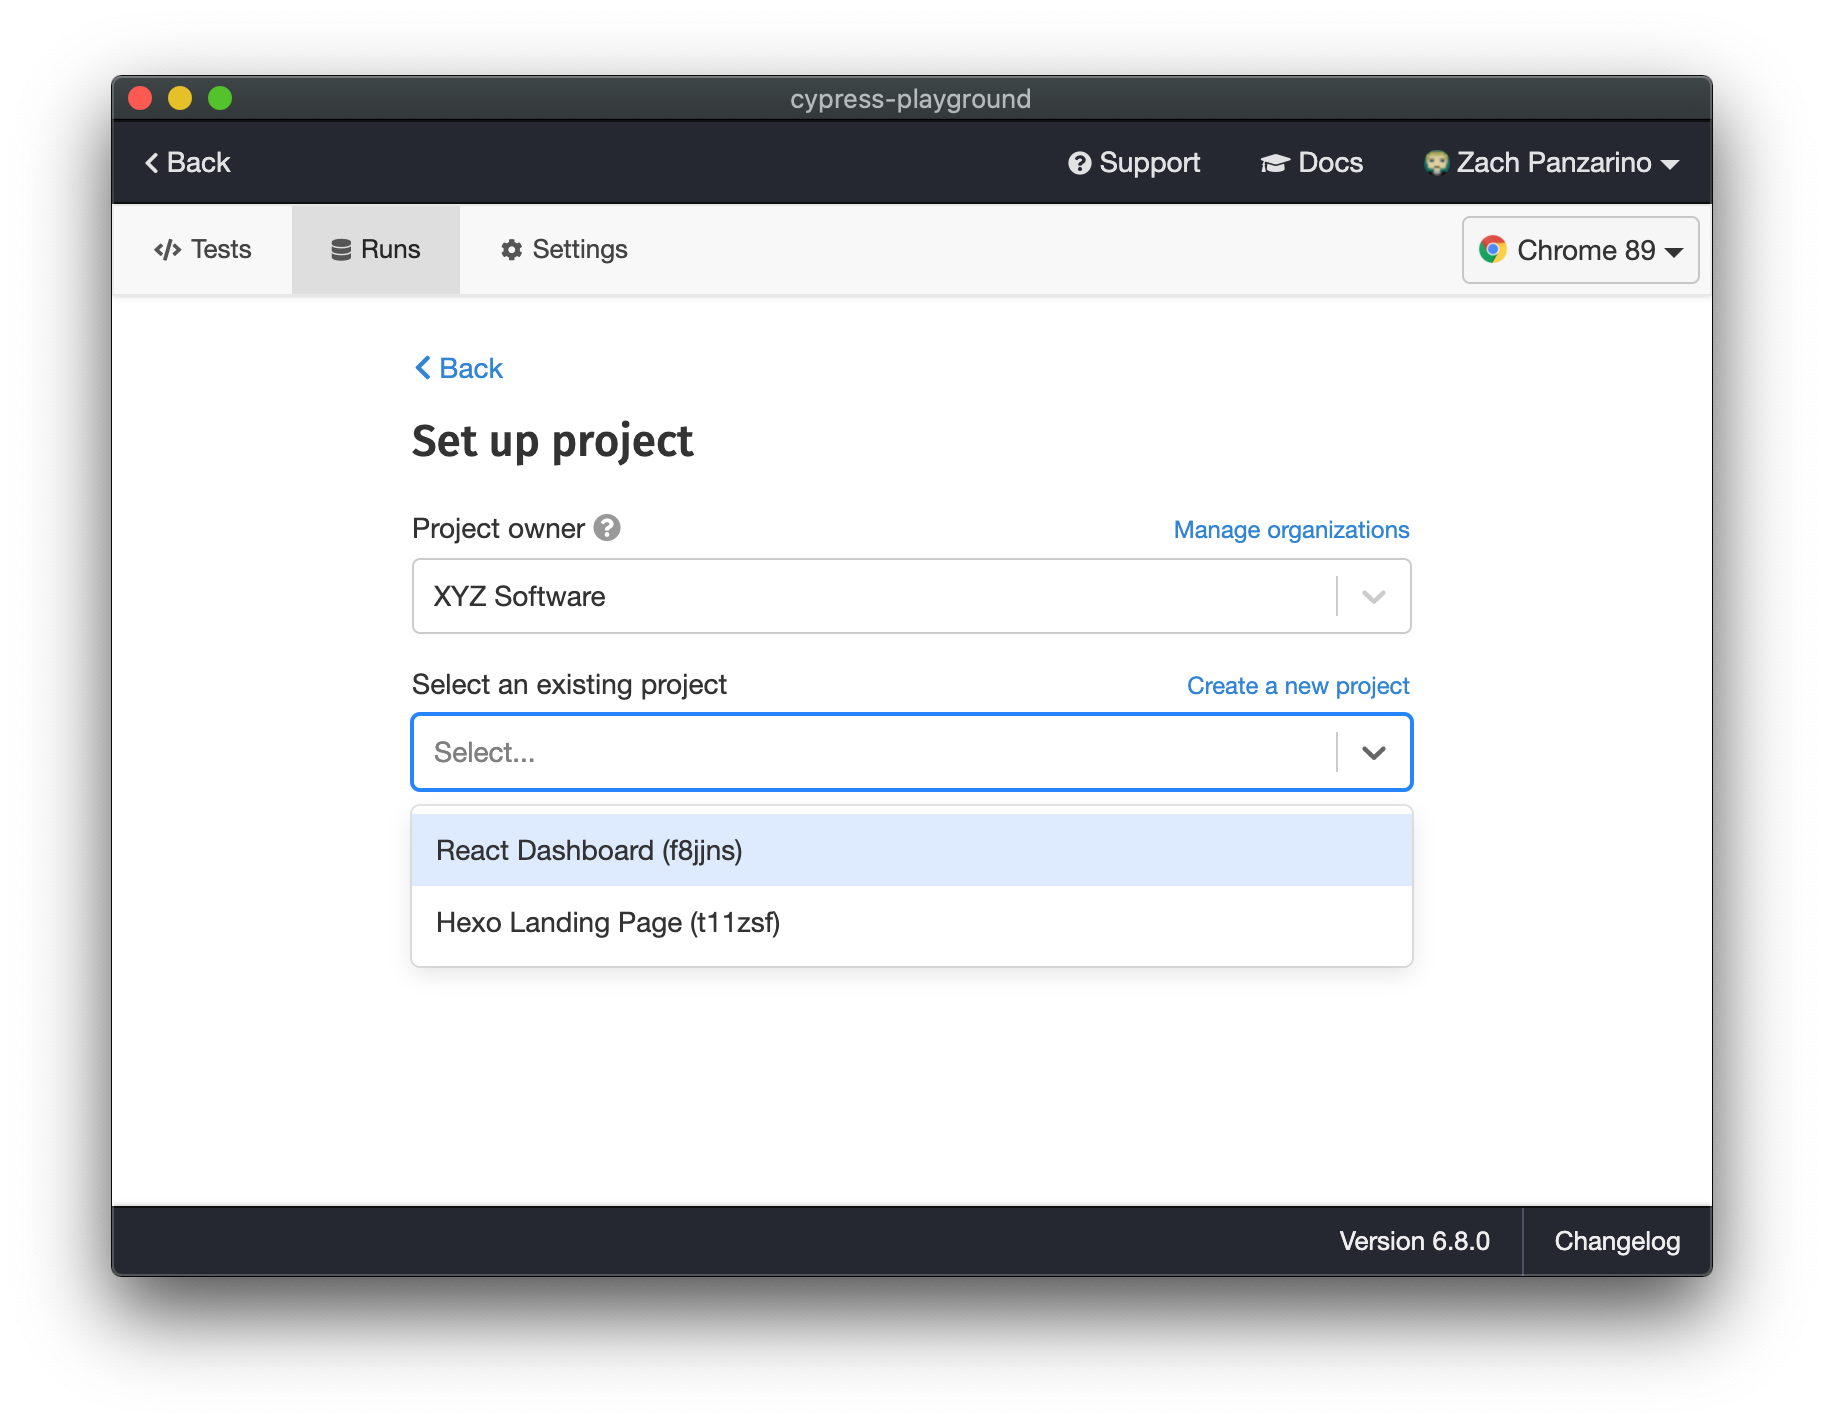
- Alternatively, if you've already created a project in the Dashboard, you can
link your project by selecting it from the dropdown. Make sure to select a
clean project that has not previously been linked to an existing project.
- Click Setup Project.
- Now you should see a view explaining how to record your first run with your
record key.
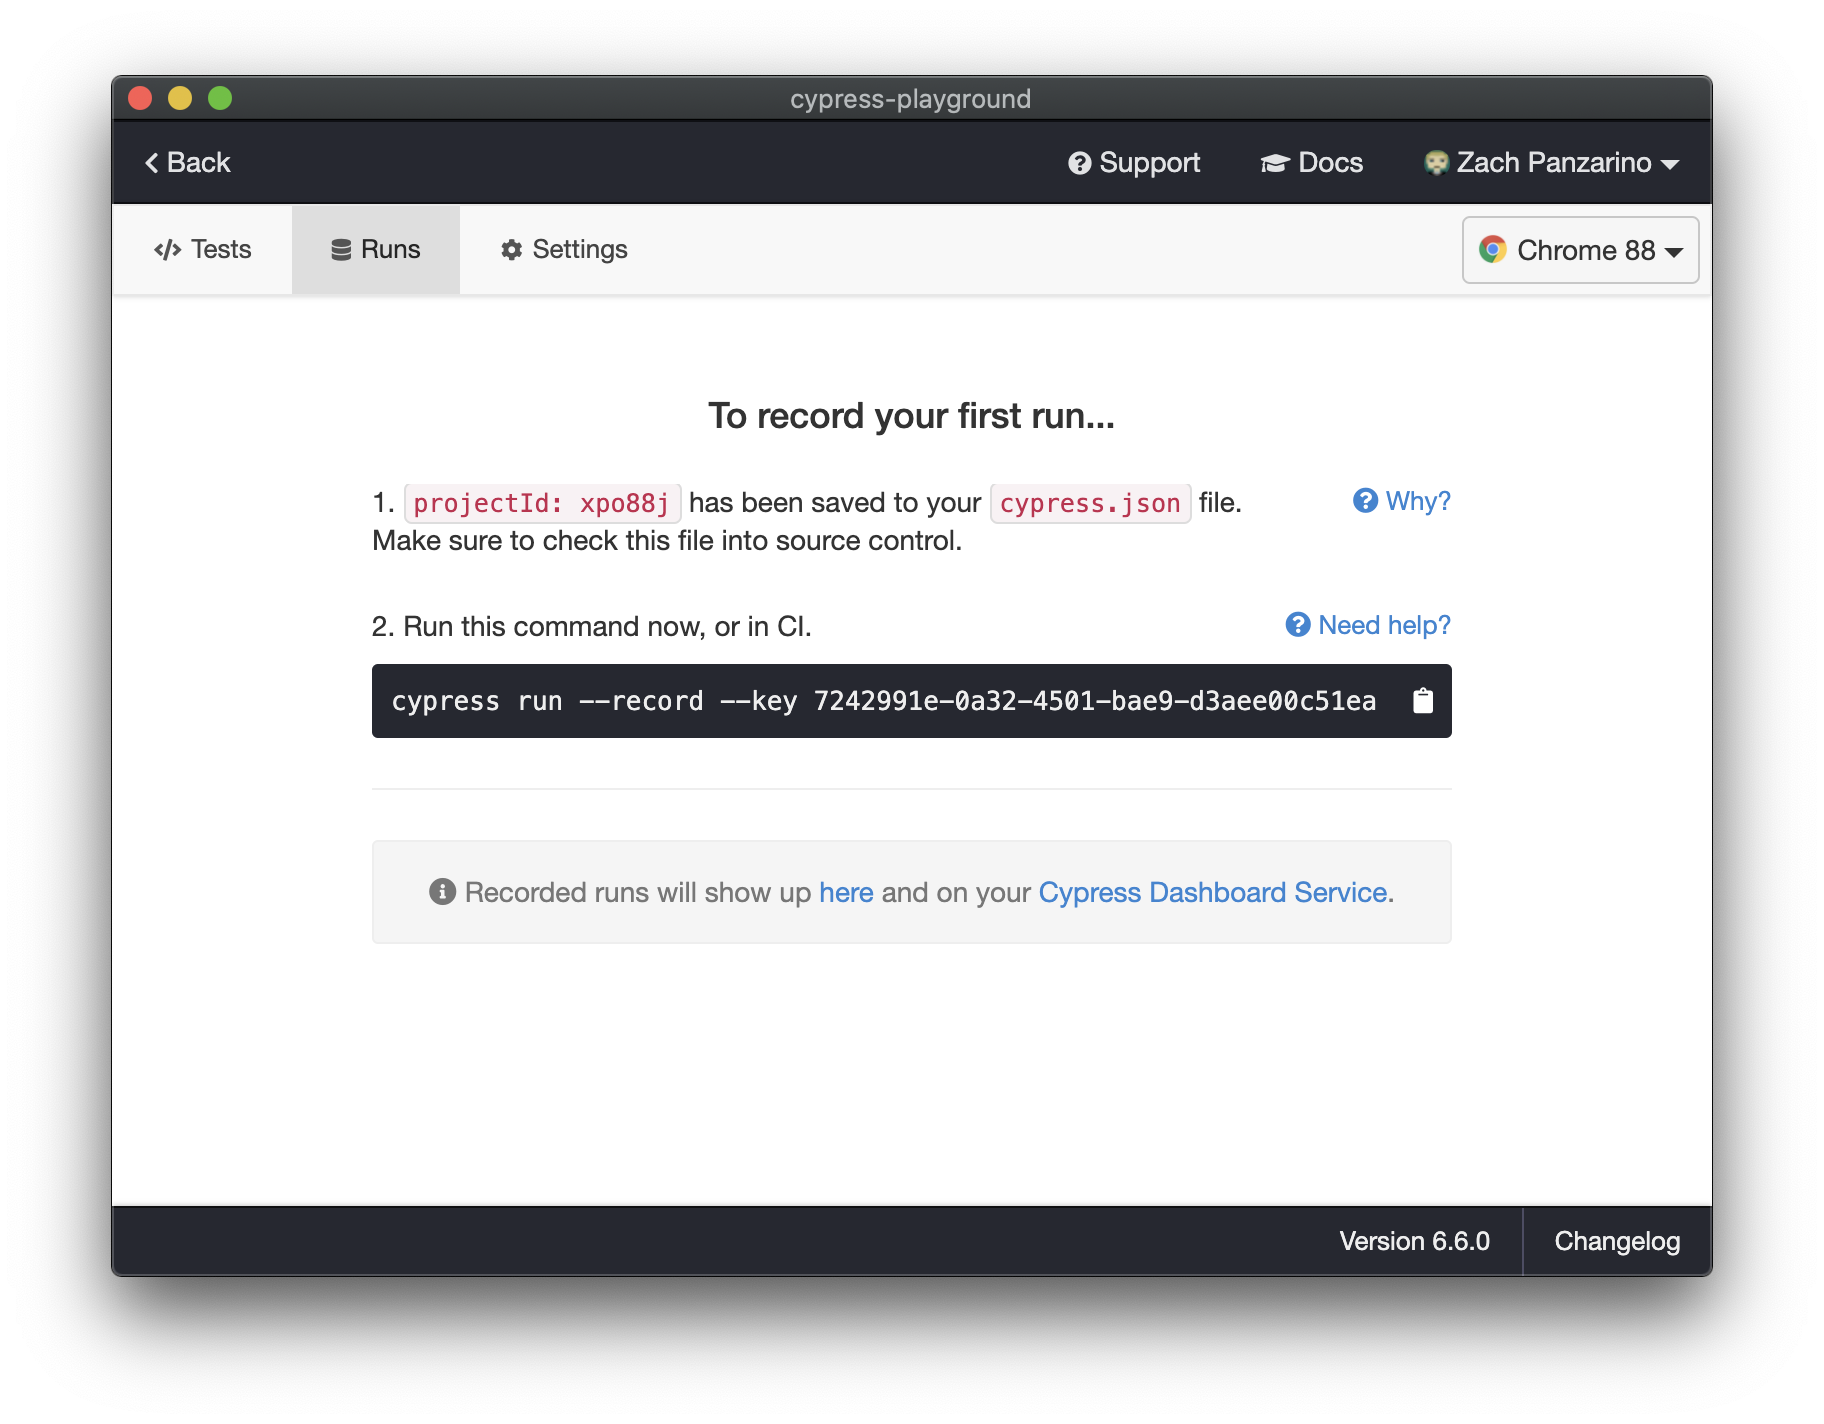
- After setting up your project, Cypress inserts a unique
projectId into your configuration file,
cypress.jsonby default. If you're using source control, we recommend that you check your configuration file, including theprojectId, into source control. - Within Continuous Integration or from your local computer's terminal pass the displayed Record Key while running the cypress run command.
-
Provide record key directly:
cypress run --record --key <record key> -
Or set record key as environment variable
export CYPRESS_RECORD_KEY=<record key>cypress run --record
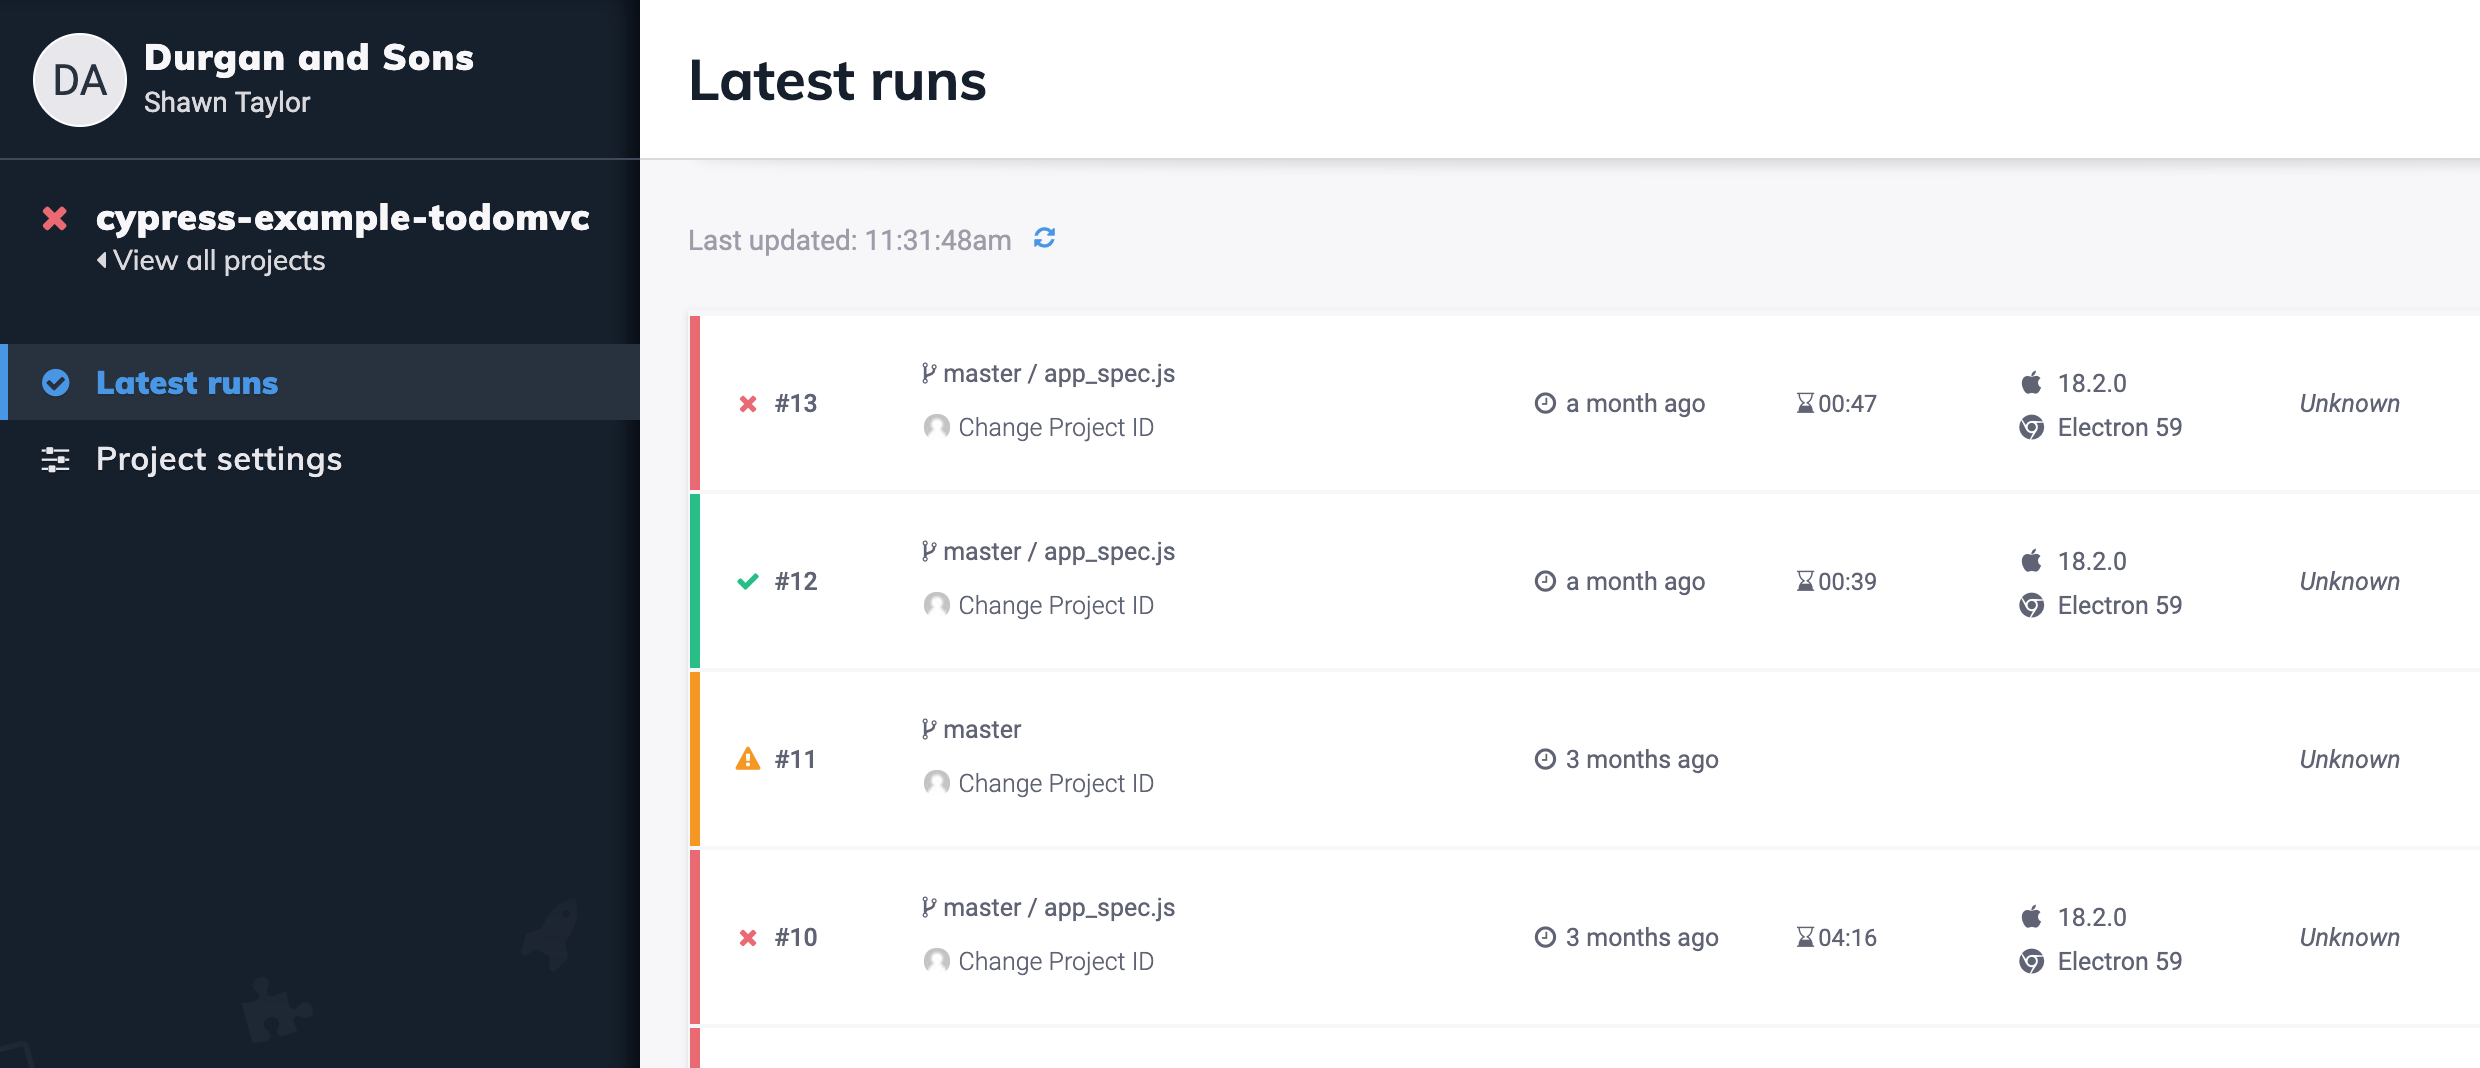
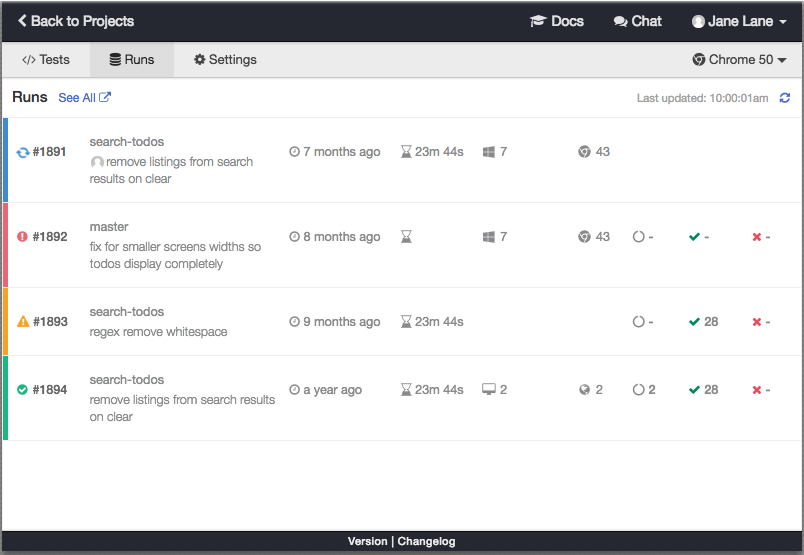
🎉 Your tests are now recording! As soon as tests finish running, you will see them in the Dashboard and in the Runs tab of the Test Runner.
Identification
Cypress uses your projectId and Record Key together to uniquely identify projects.
Project ID
Once you set up your project to record, we generate a unique projectId for
your project and automatically insert it into your cypress.json file.
The projectId is a 6 character string in your cypress.json
{
  "projectId": "a7bq2k"
}
This helps us uniquely identify your project. If you manually alter this, Cypress will no longer be able to identify your project or find the recorded builds for it.
If you're using source control, we recommend that you check your cypress.json,
including the projectId, into source control. If you don't want your
projectId visible in your source code you can set it as an environment
variable using the name CYPRESS_PROJECT_ID. The exact mechanism for doing so
depends on your system but could be something like:
export CYPRESS_PROJECT_ID={projectId}
Record key
The record key is used to authenticate that your project is allowed to record
tests to the Dashboard Service. As long as your record key stays private,
nobody will be able to record test runs for your project - even if they have
your projectId.
Think of your record key as the key that enables you to write and create runs. However, it has nothing to do with being able to read or see runs once they are recorded.
Exposing a record key
Anyone that has access to both the projectId and the record key of a project
can record runs to that organization's project in the Dashboard.
You would not want people outside of your team running tests because:
- This could drive up the number of tests you've run. Since Cypress bills based on the number of recorded tests - this means they can use up all allotted tests and there would be consequences to that.
- They can write any data they want to your Cypress Dashboard. They could edit the test suite so that recorded tests record different things than the project's original intent. This could including visiting different websites and generating videos of visiting those websites, for example.
If a record key is exposed you should delete it and create a new record key. Deleted keys will be invalid; If a project is run with a deleted key it will not be able to record.
You can set your record key as an environment variable to help protect it. Learn more here.
Once you're set up to record test runs, we automatically generate a Record Key for the project.
A record key is a GUID that looks like this
f4466038-70c2-4688-9ed9-106bf013cd73
You can create multiple Record Keys for a project, or delete existing ones from our Dashboard.
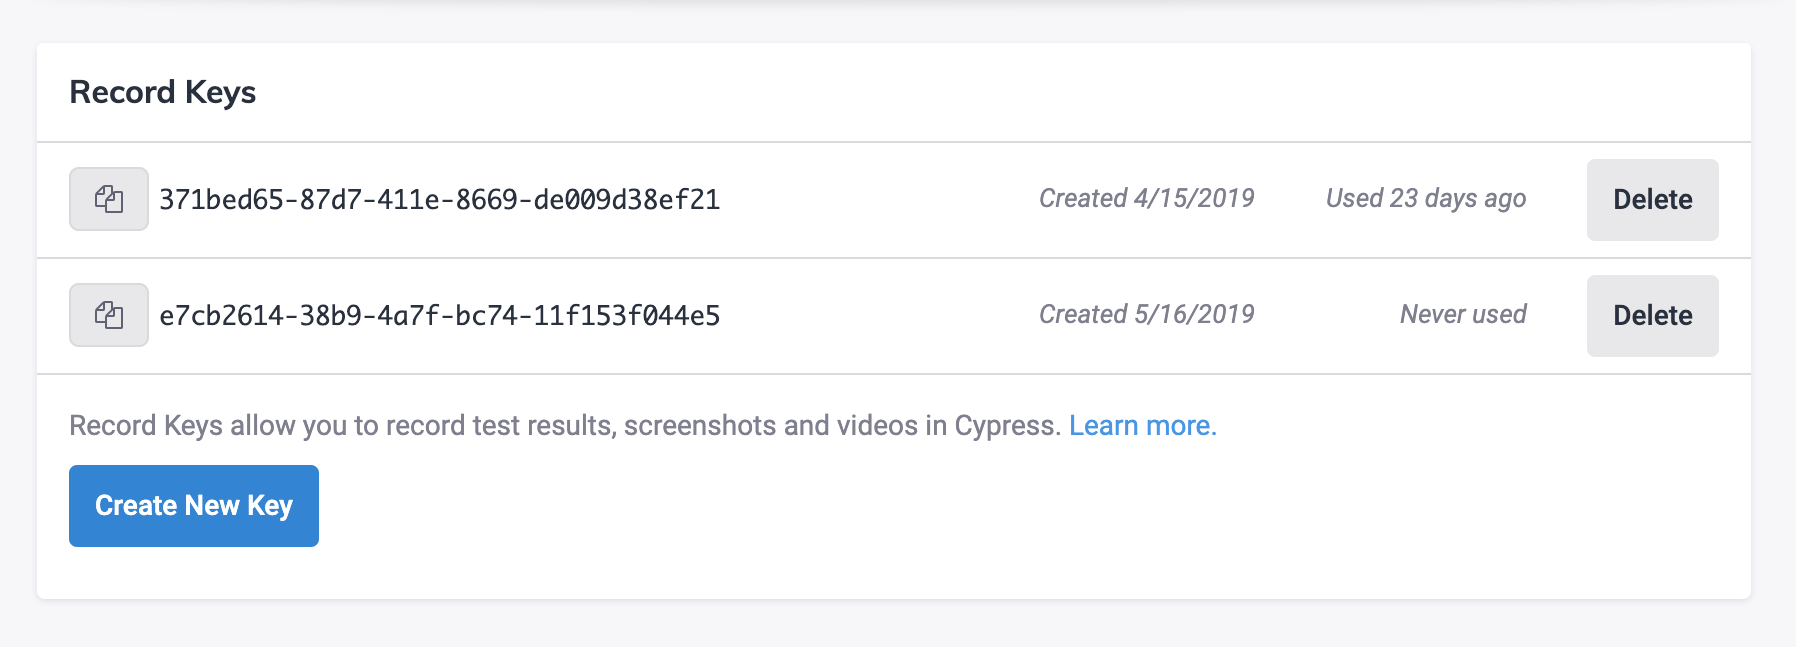
You can also find your Record Key inside of the Settings tab in the Test Runner.

Record keys
See Record key for a full description of how the record keys are used.
Create new record key
- Go to your organization's projects page.
- Select the project you want to change access to.
- Go to the project's Settings page.
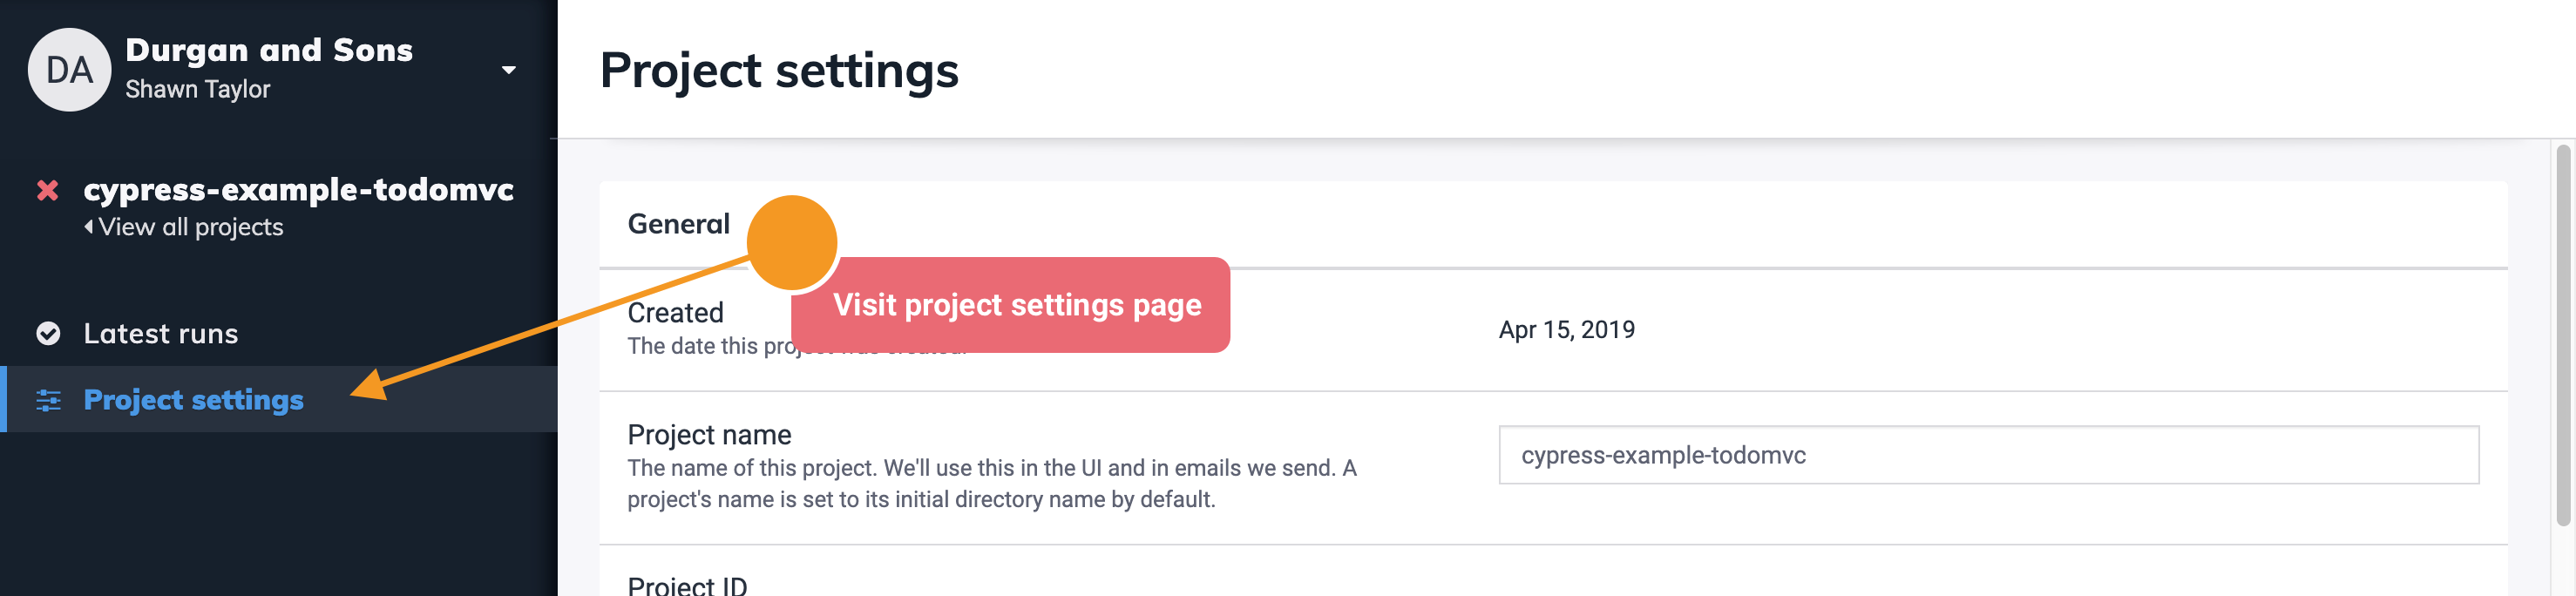
- Here you will see a Record Keys section
- Click Create New Key. A new key will be automatically generated for your project.
Delete record key
- Go to your organization's projects page.
- Select the project you want to change access to.
- Go to the project's Settings page.
- Here you will see a Record Keys section
- Click Delete beside the record key you want to delete.
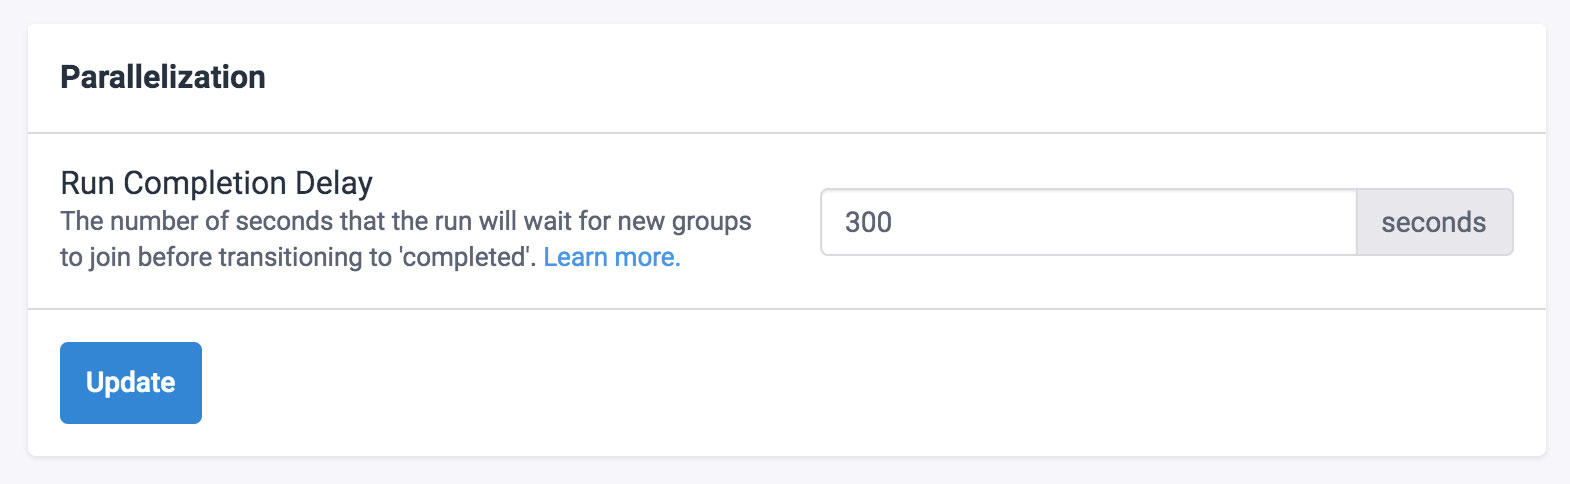
Parallelization settings
Run completion delay
You can edit the number of seconds that a run will wait for new groups to join before transitioning to 'completed'. See our parallelization guide to learn more.
GitHub Integration
You can integrate your project with GitHub and edit its settings from within the project settings page.
See our GitHub Integration guide to learn more.
Slack Integration
You can integrate your project with Slack and edit its settings from within the project settings page.
See our Slack Integration guide to learn more.
README Badges
README badges allow you to increase visibility of your project's test status and test count to other developers viewing your project's README file.
Create a README badge
- In your Cypress Dashboard account, select the project for which you’d like to create a README badge.
- On the Project Settings page, scroll down to the README Badges section and
click “Configure Badge”.

- Note: README badges are currently only available for public projects.
- A configuration modal will appear. The Project ID will be pre-filled with the ID associated with the project you selected. You can choose to designate a specific branch, or leave this field blank to always use the latest build in the project.
- Next, style your badge. Flat is the default styling and is most commonly used, but 5 style options are available.
- Select the badge type to change the amount and type of information that’s displayed. Simple status will show only whether tests are passing or failing. Detailed status will show the number of tests that were passed, failed, or skipped. Test count will show how many tests are included in your project.
- Once you’ve selected all your settings, check out the preview and make sure everything looks just the way you like it.
- 🎉 Your badge is ready to be embedded. Copy the markdown at the bottom of the Configure Badge modal, and embed it in your project’s README file for everyone to see!
See also Highlight your project’s test status with Cypress README badges announcement.
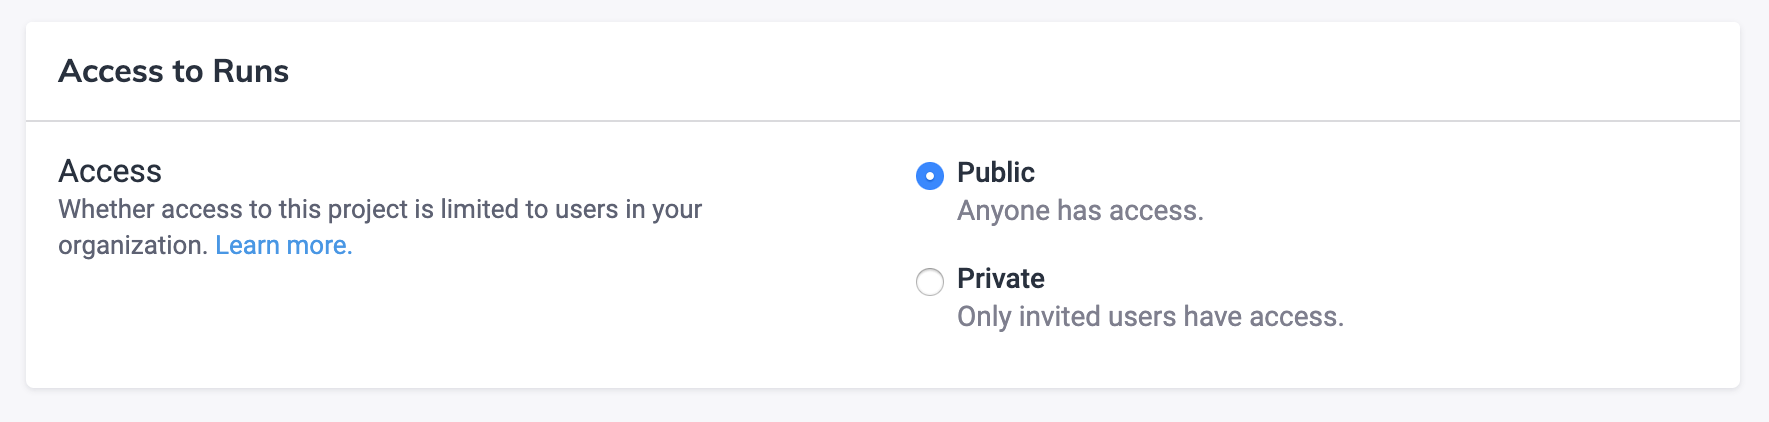
Access to Runs
Visit your project settings to see who has access to your project's runs.
Public vs Private
-
Public means that anyone can see the recorded test runs for the project. It is similar to how public projects on GitHub, Travis CI, or CircleCI are handled. Anyone who knows your
projectIdwill be able to see the recorded runs for public projects. -
Private means that only users you invite to your organization can see its recorded runs. Even if someone knows your
projectId, they will not have access to your runs unless you have invited them.
Change project access
- Go to your organization's projects page.
- Select the project you want to change access to.
- Go to the project's Settings page.
- Here you will see a section displaying Access to Runs. Choose the
appropriate access you'd like to assign for the project here.
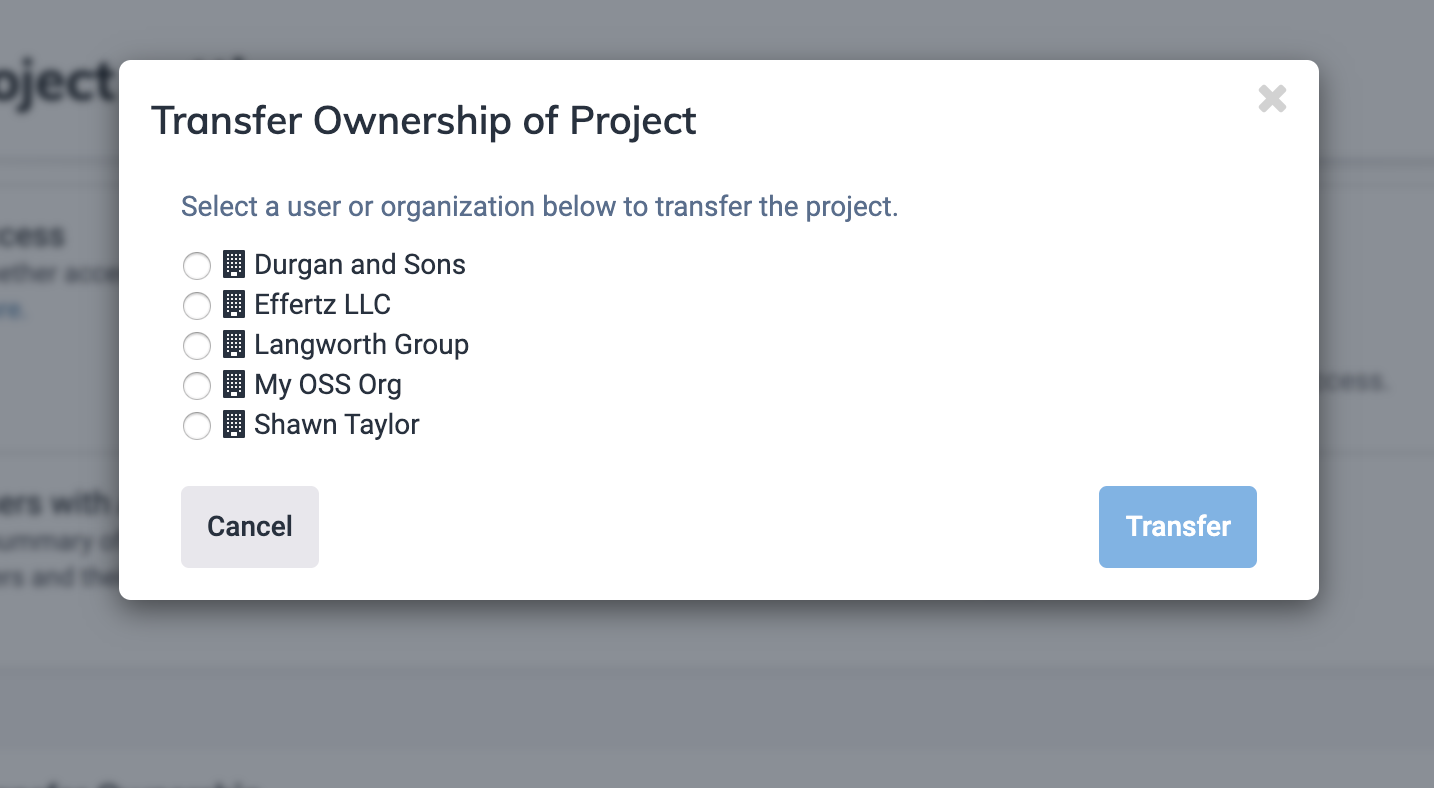
Transfer ownership
Transfer project to other user or organization
You can transfer projects that you own to another organization you are a part of or to another user in the organization. Projects can only be transferred from the Dashboard Service.
- Select your organization in the organization switcher.
- Select the project you wish to transfer.
- Go to the project's Settings page.
- Scroll down to the Transfer Ownership section and click Transfer
Ownership.

- Select the user or organization, then click Transfer.
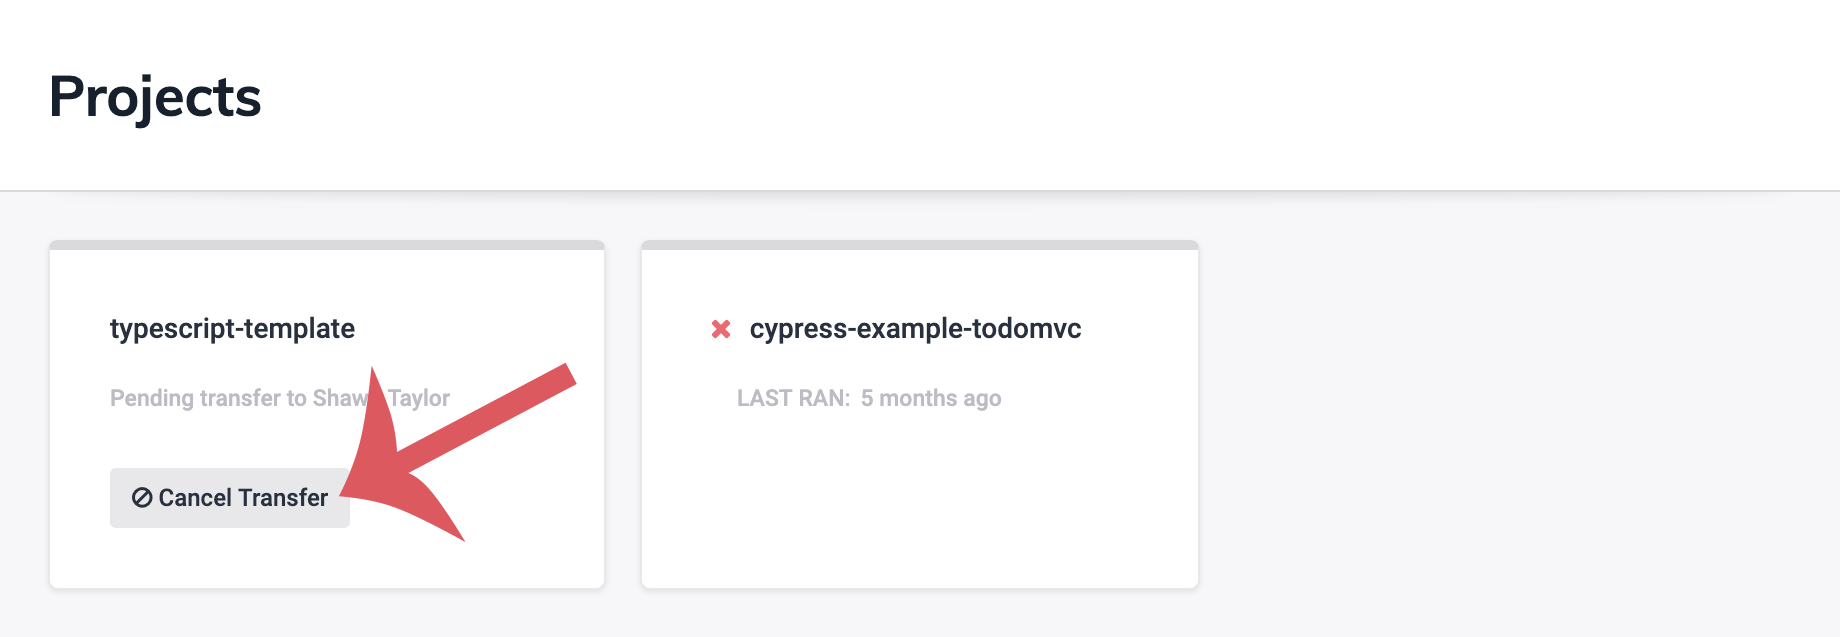
Cancel project transfer
Upon transferring, you can cancel the transfer at any time by visiting the organization's projects and clicking Cancel Transfer.
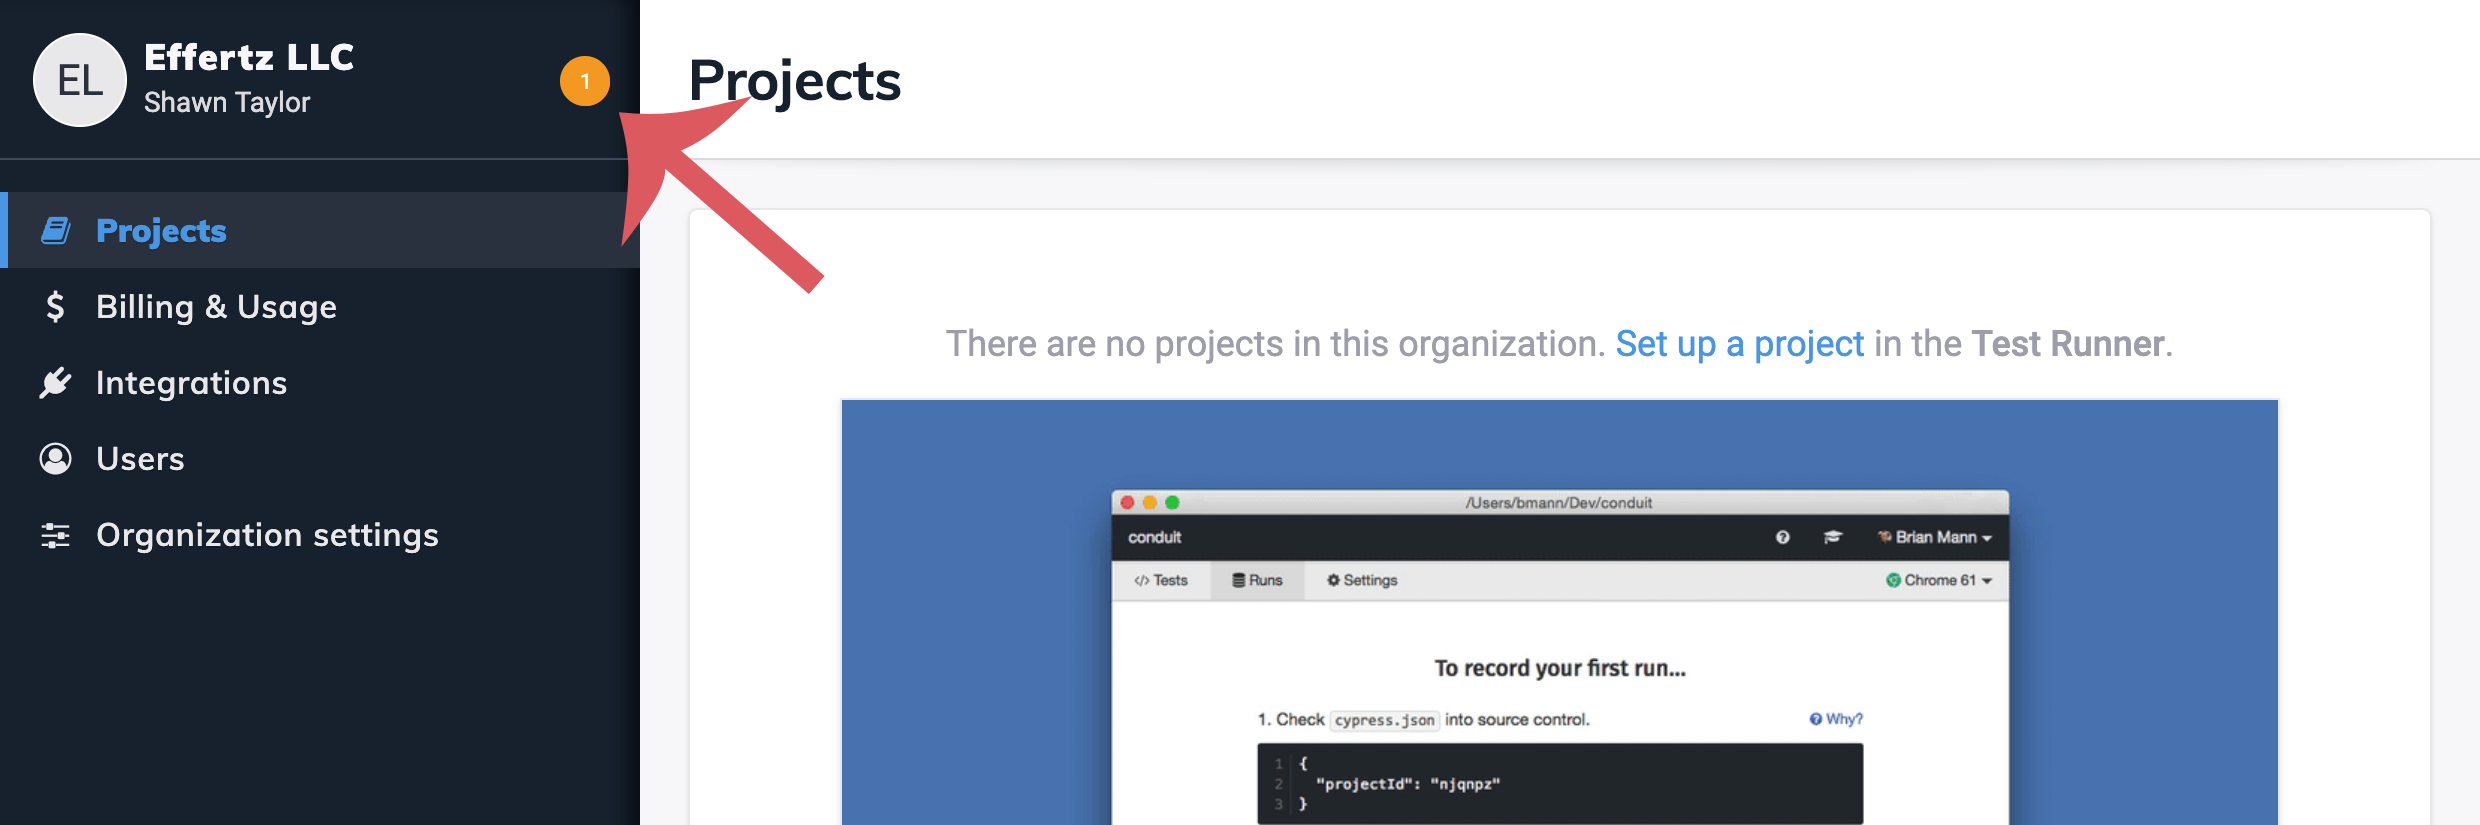
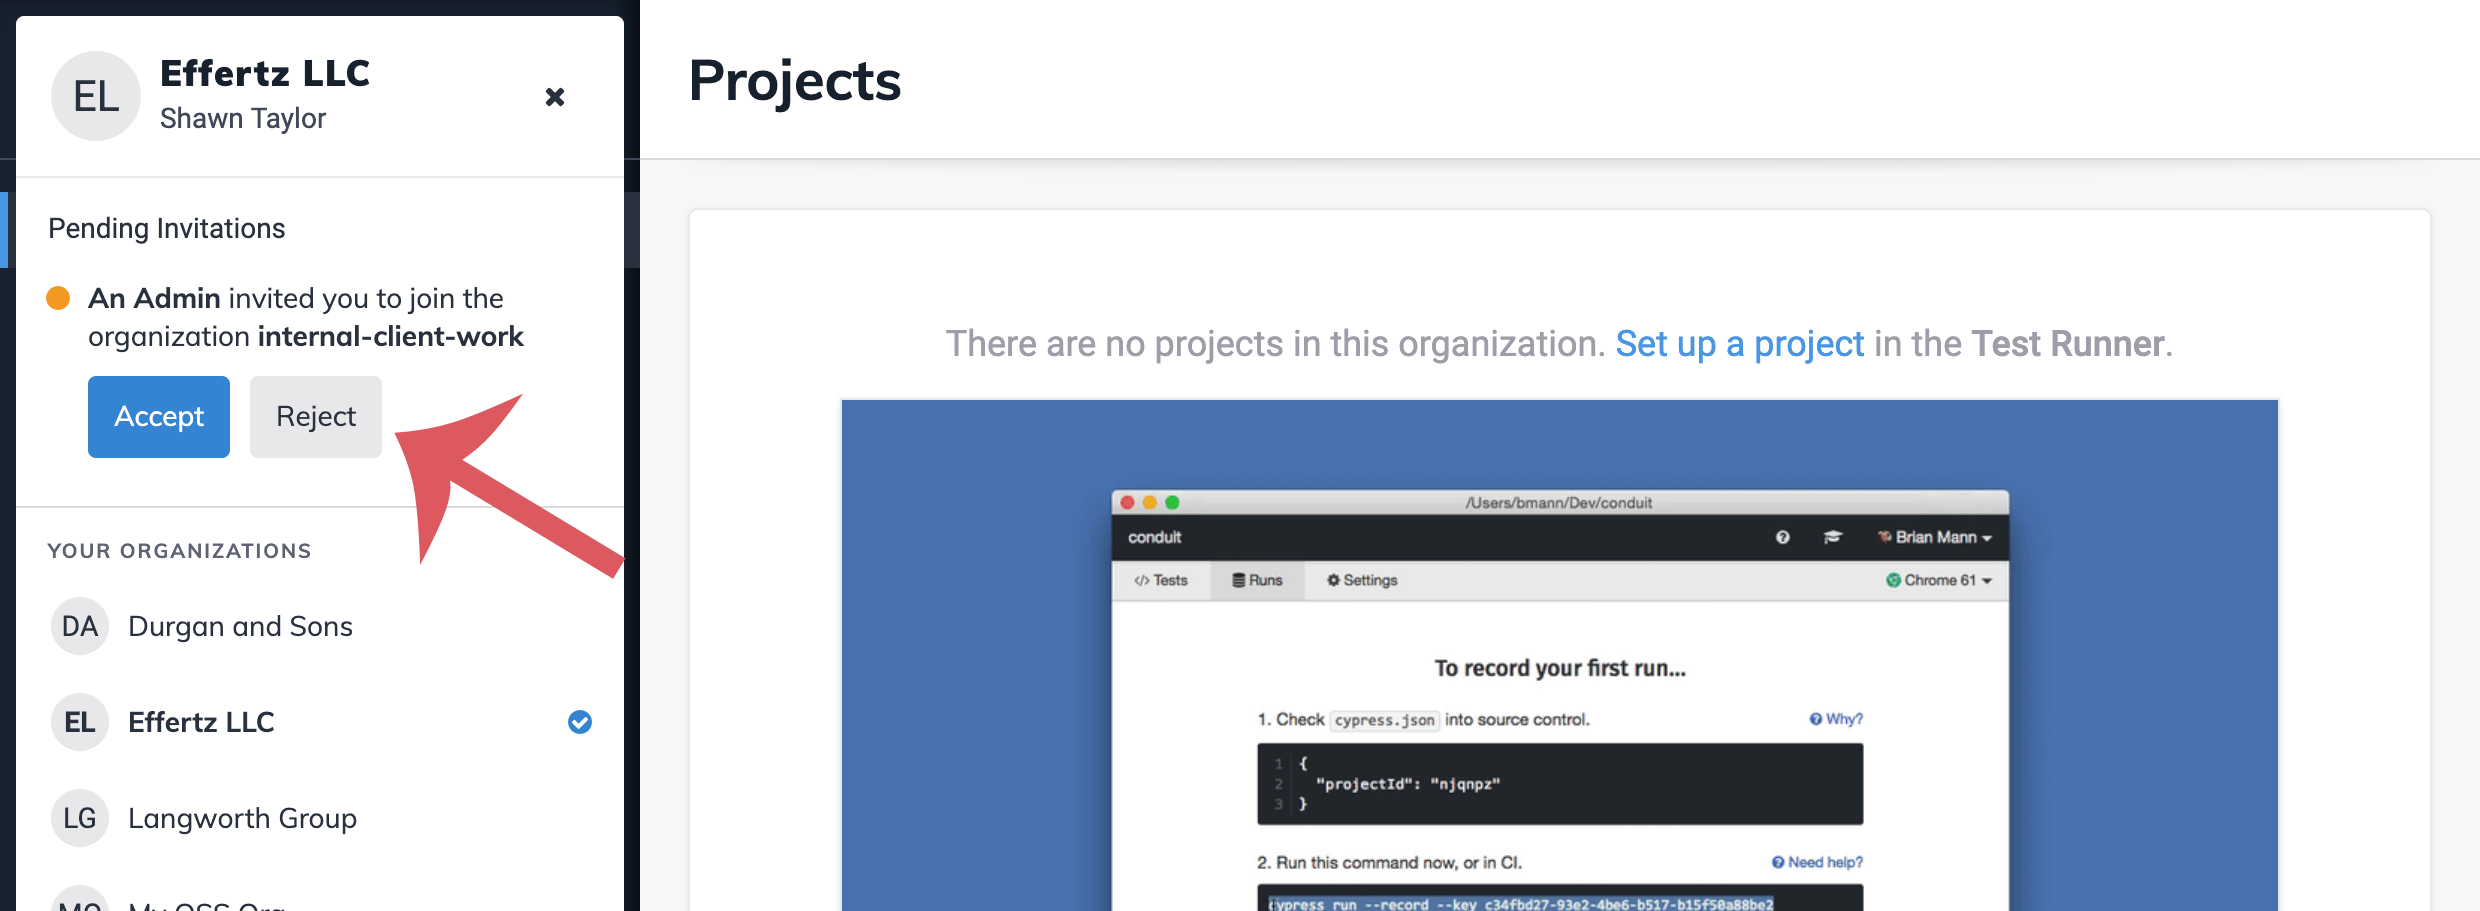
Accept or reject transferred project
When a project is transferred to you, you will receive an email notifying you. You will be able to accept or reject the transferred project by clicking the notification in the sidebar and clicking 'Accept' or 'Reject'.
Delete Project
You can delete projects you own. This will also delete all of their recorded test runs. Deleting projects can only be done from the Dashboard Service.
- Select your organization in the organization switcher.
- Select the project you want to remove.
- Go to the project's Settings page.
- At the very bottom of the Settings page click the Remove Project button.
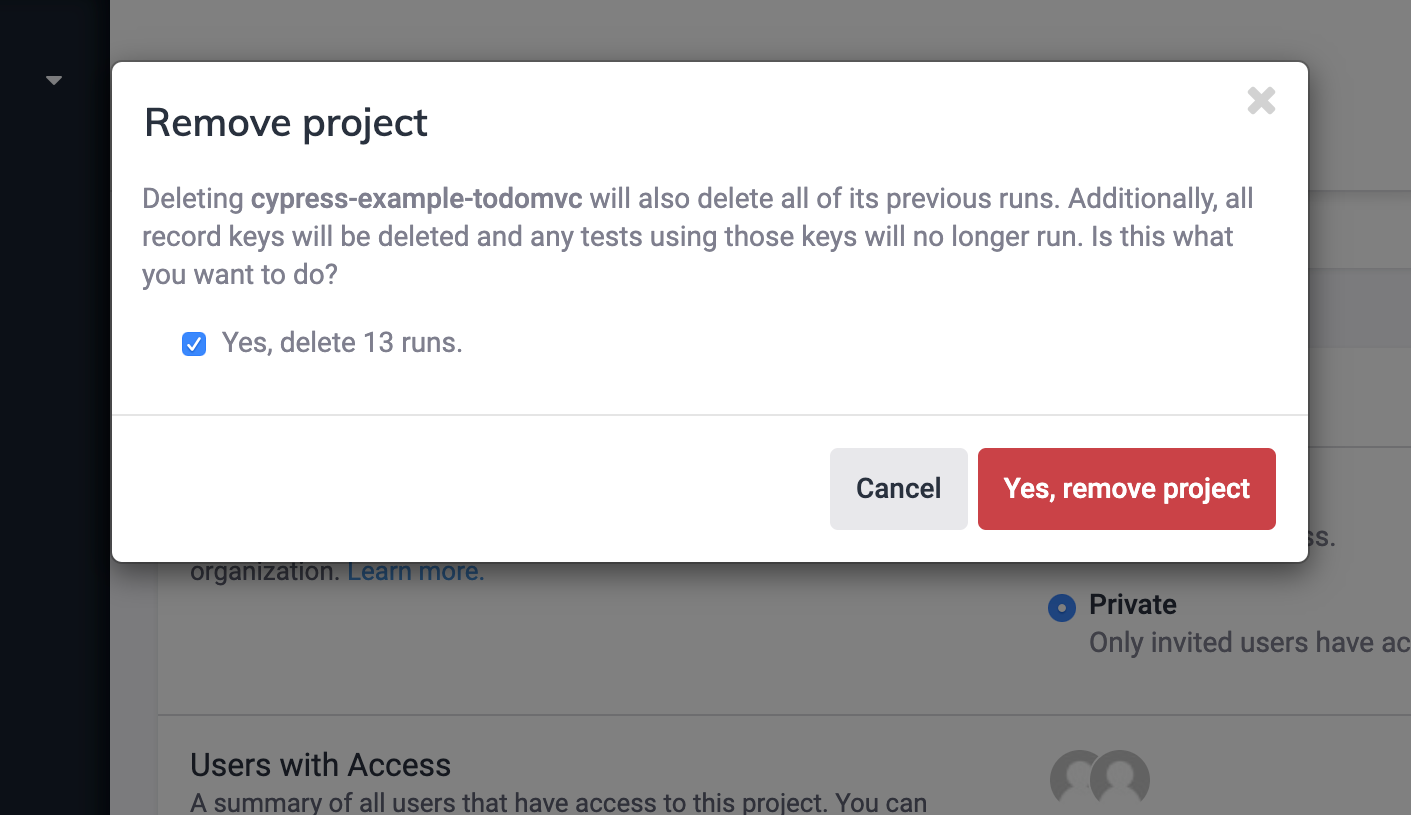
- Confirm that you want to delete the project by clicking Yes, Remove Project.